Nitrogen deficiency guide

Nitrogen deficiency guide

Nitrogen is one of the important elements a plant needs. It is an important part of proteins, chlorophyll, vitamins, hormones and DNA. Because it is a component of enzymes, nitrogen is involved in all enzyme reactions and plays an active role in the plant’s metabolism. Nitrogen is mainly absorbed by the plant in the form of nitrate and ammonium. It can also be absorbed via small organic molecules.

It is important that the balance between nitrate and ammonium is correct in the feeding otherwise the pH in the rhizosphere (environment immediately surrounding the roots) will become too high or too low. Plants with nitrate as their source of nitrogen have a higher organic acid content. This has an influence on the taste and storage life of the harvest among other things.

Nitrate is converted into ammonium in the plant by the nitroreductase enzyme. Ammonium is then assimilated into organic molecules. Nitrogen has a positive influence on the plant’s growth. The plant gets bigger leaves, more branches and the vegetative period is extended.

About nitrogen in short

What is it and what does it do?
Nitrogen is a component of enzymes and is therefore involved in all enzyme reactions and plays an active role in the plant’s metabolism.
What can you see?
Purple stalks.
Yellowing leaves.
Leaves fall of.
What can you do?
Raise EC of the feeding or add extra nitrogen.

infocourier-nitro_text_4.jpg

Symptoms of a deficiency

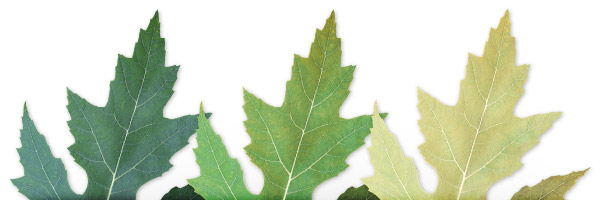
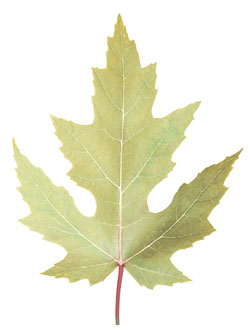
Stalks will turn purple, quickly followed by larger leaves in the middle and top parts of the plant, leaves will turn more yellow and finally the leaves whither and fall off.

Development of a deficiency

  • The plant is a lighter color as a whole.
  • Larger leaves in the lower part of the plant turn light green. The leaf stalks of the smaller leaves now also turn purple. Typical vertical purple stripes appear in the stem.
  • Leaves in the lower part of the plant turn more yellow and then become white.
  • The growth is visibly inhibited giving shorter plants, thinner stems, less leaf formation and smaller leaves.
  • Further yellowing and whitening occurs in the top and middle parts of the plant.
  • Leaves on growing points remain green longer but they are a lot less green than at normal nitrogen levels.
  • Forced flowering starts and there is substantial leaf loss. Substantial reduction in yield.

infocourier-nitro_text_3.jpg

Reasons for a deficiency

Deficiency can be caused by incorrect feeding or giving feeding that contains insufficient nutrient elements. Substrates that contain a lot of fresh organic material can cause nitrogen deficiency because micro-organisms bind the nitrogen. A lot of nitrogen can be bound, particularly in the first weeks; this is released later but it is generally too late.

Solutions to resolve a deficiency

Raise the EC of the feeding and rinse the substrate well with it.

  • Add nitrogen yourself to the feeding solution by using urea, blood meal, semi-liquid manure or by using a special “mono-nutrient’ product.
  • Spray the underside of the leaves with a nitrogen solution. This can best be done at the end of the day, just before the lights are turned off. Be careful not to cause burning.

Related Images:

Mildew

Mildew is also known as ‘downy mildew’ and as the disease spreads, the leaves curl up, necrotize and eventually fall off. The parts of the mycelium that contain the spores of the fungus emerge through the stomata of the plant. In good light it can readily be identified by the gray or purple felt like covering on the back of the leaves.

About mildew

  • What is mildew?
  • The term mildew refers to a group of phytopathogenic fungi that causes diseases in plants.
  • What can you see?
  • In general, mildew is found on the upper side of the leaf, but there are exceptions. One type of mildew only grows on the underside of the leaf. The leaf looks as if it has been dusted with powder.
  • What can you do?
  • Keep humidity low and keep your growing area clean.

About powdery mildew

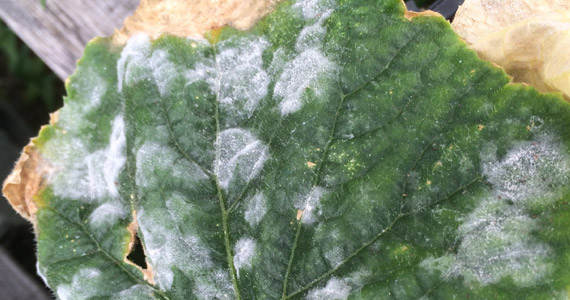
Powdery mildew is also known as Oidium. Before any symptoms become visible the leaf starts to develop blister-like patches, which is followed by the characteristic white powder where the blister was. The leaf looks as if it has been dusted with powder. In general, mildew is found on the upper side of the leaf, but there are exceptions. One type of mildew only grows on the underside of the leaf, so it’s no surprise that this often gets overlooked. However, as the disease advances, the leaves can end up being completely covered in this white layer and it can even colonize the fruits, with subsequent losses in crop size and quality.

How to prevent the disease?

The best treatment against these types of fungi is prevention; once they have set in and developed, they are very difficult to eradicate, sometimes even with chemical fungicides. Try to prevent spores coming in from elsewhere and contaminating your plants by keeping your growing area clean. You can do this by using only clean equipment and washing your hands thoroughly before entering.

articles-pests-diseases-mildew_text_2

Identification

How To Identify Powdery Mildew Damage

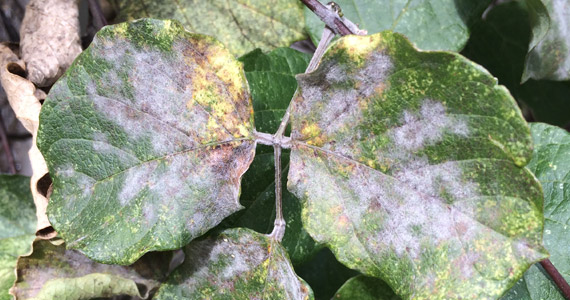
  • Plants infected with powdery mildew look as if they have been dusted with flour.
  • Powdery mildew usually starts off as circular, powdery white spots, which can appear on leaves, stems, and sometimes fruit.
  • Powdery mildew usually covers the upper part of the leaves and affects the older leaves first; the leaves turn yellow and dry out.
  • The fungus might cause some leaves to twist, break, or become distorted.
  • The white spots of powdery mildew will spread to cover most of the leaves or affected areas.
  • The leaves, buds, and growing tips will become distorted as well. These symptoms usually appear late in the growing season. 

Control and Prevention

How To Control Powdery Mildew 

  • Rubbing the infected leaves together can help partially remove the disease from your plants.
  • Remove all the infected plant parts and destroy them. Remember, do not compost any infected plant, as the disease can still be spread by the wind.
  • Spray infected plants with fungicides. Effective fungicides for powdery mildew treatments or cures include sulfur, lime-sulfur, neem oil, and potassium bicarbonate.

How To Prevent Powdery Mildew

  • Choose plants that are resistant or tolerant to powdery mildew.
  • Powdery mildew thrives in hot and humid weather, so avoid overhead watering to reduce humidity. Also selectively prune overcrowded areas to increase air circulation; this also helps reduce humidity for your plants.
  • Spray your plants with fungicides according to their directions. If you don’t want to use fungicides, try spraying your plants with a solution of 1 teaspoon baking soda in 1 quart of water. Remember to spray your plants thoroughly.

Plumeria that grow in crowded, humid or shaded conditions are susceptible to powdery mildew, a form of mold. Powdery mildew is a common fungal disease that affects many types of plants, from squash to plumerias. The signature symptom of powdery mildew is white or gray powdery spots on the upper sides of plumeria leaves. The spots sometimes appears on flowers, buds, the undersides of leaves and new shoots. As the infection progresses, the leaves turn yellow, become distorted and drop off prematurely, and flower buds fail to open. The fungus overwinters in brown or black fruiting bodies.

Related Images:

Black Tip Fungus

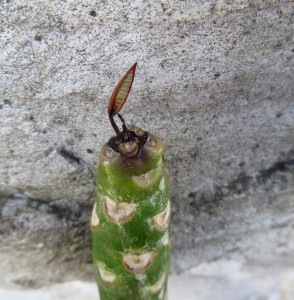
black-tip-fungus-plumeria-3-294x300The fungus known as black tip occurs after the plumeria crowns have been exposed to frost or sometimes just cold winter morning dew. The healthier and larger the frangipani, the more resistant it will be to black tip damage. Some fungicides treat it better than others but it can be treated. If the black tip is severe, the tip will die and new shoots will grow from the sides of the branch, creating branches. When you see new shoots growing from the side of the plant, you should cut off the dead tip with a clean cut. Sometimes, rot can start in a damaged tip.

  • In early spring,at the first signs of new growth, a bacterial problem commonly known as “black tip” can appear. This causes die back of the new growth but creates more branches.
  • “Black tip” rarely kills the tree.
  • The cause of the “black tip” fungus is low spring temperatures combined with high humidity.  By late spring when temperatures increase the “black tip” disappears.
  • To try and reduce its unsightly appearance seaweed extract liquid fertilizers can help. Begin foliar spraying at the first signs of new growth prior to the first signs of the “black tip” fungus and then spray once a week until early summer.
  • Using hydrogen peroxide has been know to minimize the damage.

Black Tip Fungus is very hard to control once it gets a big head start.  Black Tip can pop up at any time of the year.  Black Tip Fungus loves cool, wet, and shady areas.  When the conditions are right is can pop up virtually overnight, and spread like wildfire.

Black sooty mold forms a black mold on plumeria leaves. You’ll know if the black tip fungus has attacked your plumeria tree if you see black tips on the branches’ growing tips in spring. Affected branches will stop growing. If you catch this fungal disease soon after it first appears, you’ll have success in halting its spread. Spray the tree with an approved fungicide as soon as possible, and also cut affected branches back to disease-free wood.

If left uncontrolled it will kill the growth tips of mature trees, and kill entirely a small plumeria.   If Black Tip has killed the growth tips on a mature plumeria and temperatures warm up, the black tip will die off.  Then the blacked tips will callus and break off.  Next, the plumeria will branch back out as if it was pruned.  Sometime on a tree it’s not all bad, because it gets a ton of new branches, but if it happens every year, or disgustingly, twice a year you will have hell getting you plumerias to bloom. 

You can help control it by controlling ants, which bring aphids and scale to your tree and feed on their sticky excretion. If you smear a think (1/2 inch) layer of a product called Tree Tanglefoot around the base of your plumeria tree, ants will be unable to pass over it. Black sooty mold can also result from exposure to whiteflies and thrips: control these pests with yellow sticky traps and insecticidal soap spray. If necessary, spray your tree with a broad spectrum fungicide.

Related Images:

Plumeria Rust

Rust Fungus is caused by Coleosporium dominguense and Coleosporium plumeriae 

In general, however and given rust is rather specific in its host range.  Many rust have several kinds of microscopic spores.

The plumeria cultivars most susceptible to this fungus are the Plumeria rubra types and the Plumeria obtusa. This fungus manifests itself as red-orange pustules on the backsides of leaves. It presence can always be determined be the appearance of yellow, orange or reddish-brown powdery pustules on the leaves, stems, or buds of the infected plant. The spores produced in these pustules are carried by splashing rain or air currents to near-by healthy plants where new infections will occur. Your first line of attack should be to cut off affected leaves. Do not add them to a compost pile because the disease can spread. The Plumeria Society of America recommends using a broad spectrum fungicide—those products containing bayleton, benomyl or oxycarboxin are appropriate. Cutting down tall weeds around plumeria trees helps to improve air circulation and will reduce the humidity this pathogen needs to survive. Also, when you plant plumeria trees, be sure to leave plenty of space between trees.

Rust Fungus does not kill Plumeria, but can rapidly de-foliate an entire tree.

Most plumeria cultivars grown are susceptible to the pathogen and have numerous powdery spore masses on the underside of leaves. Leaves can turn brown and fall from the plant as early as two months after the springtime flush of new leaves is infected by the fungus.

How to Control Rust Fungus

  • Keep the growing area clean and free of fallen leaves.
  • Carefully remove and place infected leaves into trash bags.
  • Mild outbreaks can be controlled by fungicides such as GreenLight “Fung-Away” spray.
  • The only proven chemical to control rust is products containing Bayleton. Bayer Bayleton 50 fungicide and Strike 50 are two products know to help control rust.
  • To best control rust, you will need to setup a regular  regiment and treat the entire infected area. 
Rust fungus will over-winter on infected plants.   


Additional Ideas for Controlling Rust Fungus

Plumeria trees in sunny, well-ventilated locations are less susceptible to mold infections. Fungicides, including mycobutanil, control plumeria rust, according to the University of Hawaii at Manoa Cooperative Extension. Dispose of fallen rust-infected leaves, and spray the ground under the tree in the winter. Apply copper fungicide, neem oil or horticultural oils during early stages of powdery mildew infection, and remove any diseased leaves and stems. To prevent sooty mold, inspect stems and the undersides of leaves for insects, and remove the insects by hand or with insecticidal soap or a forceful stream of water. Carefully follow pesticide label directions and precautions.

Additional reading form University of Hawaii  pd-61-1

Related Images:

Sooty Mold

Sooty mold is actually a symptom of an aphid, whitefly or thrip infestation. These tiny insects feed on plumeria leaf and stem juices and secrete a sticky, sugary liquid called honeydew. Clusters of the insects may be visible on the undersides of infested leaves. Black sooty mold grows in the honeydew on plumeria leaves and stems. The mold can interfere with photosynthesis as it coats the leaves, and can cause stunted growth and reduced plant vigor.

Control

Plumeria trees in sunny, well-ventilated locations are less susceptible to mold infections. Fungicides, including mycobutanil, control plumeria rust, according to the University of Hawaii at Manoa Cooperative Extension. Dispose of fallen rust-infected leaves, and spray the ground under the tree in the winter. Apply copper fungicide, neem oil or horticultural oils during early stages of powdery mildew infection, and remove any diseased leaves and stems. To prevent sooty mold, inspect stems and the undersides of leaves for insects, and remove the insects by hand or with insecticidal soap or a forceful stream of water. Carefully follow pesticide label directions and precautions.

Related Images:

(FMV) Virus-causing color break in Plumerias

(FMV) Virus-causing color break in Plumerias

Based upon visual observation of infected plumeria plants from various places for a number of years, it seems that Frangipani Mosaic Virus (FMV) has a minimal effect on the growth and the health of most plumerias with the exception of severe cases in a few cultivars. Its symptoms may include, e.g., leaf malformation, mottled leaf, and/or splash or color break (CB), especially on the petals. Some plumeria trees appear normal with only an occasional CB on the petals, which is attractive to some people.

From my point of view, however, the color break is unacceptable since it distorts the original colors of flowers. In addition, unlike other diseases, it is incurable, and the virus that resides in the infected plant may accidentally spread to other plumeria trees somehow, and finally, the whole collection may all be infected.

According to ICTVdb, the FMV transmitted by mechanical inoculation not involving a vector. 

Suggested reading related to Frangipani Mosaic Virus: click…DPVWeb or 
https://www.ncbi.nlm.nih.gov/pubmed/26239043

Characterisation and diagnosis of frangipani mosaic virus from India.

Author(s) : Alok KumarVikas SolankiVerma, H. N.Bikash Mandal

Author Affiliation : Advanced Centre for Plant Virology, Division of Plant Pathology, Indian Agricultural Research Institute, New Delhi, 110 012, India.

Author Email : leafcurl@rediffmail.com

Journal article : Virus Genes 2015 Vol.51 No.2 pp.310-314 ref.14

Abstract : Frangipani mosaic virus (FrMV) is known to infect frangipani tree (Plumeria rubra f. acutifolia) in India but the virus has not been characterized at genomic level and diagnosis is not available. In the present study, an isolate of FrMV (FrMV-Ind-1) showing greenish mosaic and vein-banding symptoms in P. rubra f. acutifolia in New Delhi was characterized based on host reactions, serology and genome sequence. The virus isolate induced local symptoms on several new experimental host species: Capsicum annuum(chilli), Nicotiana benthamiana, Solanum lycopersicum and S. melongena. N. benthamianacould be used as an efficient propagation host as it developed systemic mottle mosaic symptoms all round the year. The genome of FrMV-Ind-1 was 6643 (JN555602) nucleotides long with genome organization similar to tobamoviruses. The Indian isolate of FrMV shared a very close genome sequence identity (98.3%) with the lone isolate of FrMV-P from Australia. FrMV-Ind-1 together with FrMV-P formed a new phylogenetic group i.e. Apocynaceae-infecting tobamovirus. The polyclonal antiserum generated through the purified virus preparation was successfully utilized to detect the virus in field samples of frangipani by ELISA. Of the eight different tobamoviruses tested, FrMV-Ind-1 shared distant serological relationships with only cucumber green mottle mosaic virus, tobacco mosaic virus, bell pepper mottle virus and kyuri green mottle mosaic virus. RT-PCR based on coat protein gene primer successfully detected the virus in frangipani plants. This study is the first comprehensive description of FrMV occurring in India.

ISSN : 0920-8569

DOI : 10.1007/s11262-015-1228-3

URL : http://link.springer.com/article/10.1…

Record Number : 20153349035

Publisher : Springer

Location of publication : Dordrecht

Country of publication : Netherlands

Language of text : English

Language of summary : English

How to Avoid FMV Virus in Plumerias

Note: There is no effective treatment for FMV transmitted by mechanical inoculation not involving a vector.

Viral-contaminated cutting tools used in grafting and pruning are likely the most common means of FMV transmission. Unfortunately, it is how this particular virus spreads rapidly and covertly in plumerias, especially in Thailand

Nowadays, symptoms are commonly seen in plumerias which are sold in the markets everywhere. Some virused plumerias may look normal, but the symptoms generally appear in a later stage. Thus it is important to address this issue to increase growers’ awareness, to keep the virus under control, and to save all great plumeria cultivars from being infected. 

Follow these Practices to prevent the spread of FMV

1. In an attempt to keep the whole plumeria collection virus-free, newly acquired plumerias should be isolated over a period of time to observe or check (test) for the presence of virus.

2.  All FMV-infected plants should be separated from the rest of collection and/or destroyed.

3.  Using a sterilized cutting tool is also the key to preventing the spread of the FMV, which may be present in the plumeria trees growing in the garden, to the rest of the collection.

4.  My routine practice of pruning plumerias in the garden is to carry as many sterilized knives as possible with me and use only one knife per plumeria plant. They are then sterilized in boiling water for further use.

5. Plumerias with the virus should not be allowed to be registered as a new cultivar based upon its appearance of the flowers with the color break. It is just a diseased plant, not an innovative one.

Related Images:

Stem Rot

Stem Rot is a disease that causes the decaying of the inner layers of the Plumeria. The plumeria stem becomes soft and squishy as the inside rots away.  Stem rot moves very quickly and is almost always fatal to cuttings. Stem Rot usually occurs while trying to root cuttings or during winter storage.

Cool temperatures and wet soil contribute to Stem Rot.  Rooting cuttings and newly rooted plumerias are at highest risk for developing stem rot.

Stem rot officially is a disease caused by a fungus infection in the stem. Fungus that causes stem rot are Rhizoctonia, Fusarium and Pythium. Stem rot can readily infect crops that are in their vegetative or flowering stages. The disease can survive up to five years in the soil. Symptoms of stem rot includes staining of infected area, reduced crop yield and crop failure.

  • The disease can be spread through the use of unfiltered water as well as unsterilized tools.
  • Also leaving previous dead roots in soil can increase the risk of stem rot. Spores can also enter the plant through injured stem tissue on the plant including from insect attacks. The fungus impedes stem functions like transporting nutrients. It can cause water to leak through the lesions of stem tissue.
  • An issue with maintaining this disease is the lack of management by crop producers. Producers of plumeria tend to not manage for the disease because it normally results in the loosing of the affected cuttings or newly rooting plants.
  • Fungicides can be used to manage the disease as well as burning the crop after harvest or letting it decompose.

What it does

Stem rot leads to formation of lesions and production of chalky grains and unfilled panicles.

Why and where it occurs

The infection bodies or sclerotia are found in the upper soil layer. They survive in air-dry soil, buried in moist soil, and in tap water. They can also survive on straw, which is buried in the soil. 

Infection is high on plants with wounds as a result of taking cutting with infected tools or rooting cuttings with infected soil. The panicle moisture content and nitrogen fertilizer also influence disease development.

How to identify?

Check the plant for the following symptoms:

Infected stem rots

  • visible numerous tiny white and black sclerotia and mycelium inside the infected culms
  • infected culm lodges and caused unfilled panicles and chalky grain
  • The stem becomes soft or mushy.
  • Initial symptoms are small, irregular black lesions on the outer leaf sheath near water level. Lesions expand as the disease advances.

Why is it important?

The infection is seen on the rice crop during early heading and grain filling. The leaf sheaths decay and cause lodging and lower grain filling. It can cause heavy losses in many countries.

For example, in Japan, there are 51,000−122,000 hectares infected and estimated annual losses of 16,000−35,000 due to this disease. In Vietnam, the Philippines, and India, losses from 30% to 80% were recorded.

How to manage?

  • Burn straw and stubble or any crop residue after harvest or let the straw decompose.
  • Drain the field to reduce sclerotia.
  • Balance the use of fertilizer or perform split application with high potash and lime to increase soil pH.
  • Chemicals such as fentin hydroxide sprayed at the mid-tillering stage, thiophanate-methyl sprayed at the time of disease initiation can reduce stem rot incidence in the rice field.
  • Other fungicides such as Ferimzone and validamycin A also show effectivity against the fungus.
  • Do not reuse soil know to to have had infected plants.
  • Root only in fresh sterilized soil.

Once a Plumeria has survived it’s first winter, Stem Rot is usually not a problem.

Plumeria Cuttings:  Infected cuttings typically fail to root. Instead they develop rot that gradually moves up the stem. Leaf wilt and leaf spotting may be evident. The rotted stem eventually becomes shriveled, turns dull dark brown to black in color, and falls over in its pot.

Mature Plumerias:  Although rare,  mature plants can lose a branch or two from stem rot and/or freeze damage.  Freeze damage looks almost the same as Stem Rot.  In either case, with mature plumeria just cut off the affected areas and a mature plumeria will bounce right back with new branches and leaves.

Related Images:

Soils and Growing Mediums

What Is Soil?

Soil is a living, breathing, natural entity composed of solids, liquids, and gases.

Soil has five major functions:

  1. Provides a habitat for organisms
  2. Recycles waste products
  3. Filters water
  4. Serves as an engineering material
  5. Provides a medium for plumeria growth

Our focus will be on the fifth function. In this role, soil provides structural stability for plumeria and retains and relinquishes water and the nutrients necessary for plumeria growth.

An ideal soil for plant growth contains 50% porespace and 50% solids, with the porespace filled with equal parts air and water. This distribution rarely occurs because porespace varies with soil texture and soil management. For example, tilling increases porespace, while poor drainage and compaction reduce it.

Soil solids are a blend of mineral materials and organic matter. The mineral materials are typically weathered rock of varying sizes called sand, silt, and clay. The organic matter consists of decaying plant and microbial residues. The relative amounts of porespace and mineral and organic matter vary greatly among different soil types. But for plumeria growth, most soil scientists agree that 50% porespace, 45% mineral matter, and 5% organic matter make up an ideal ratio. The distribution of soils and porespace in compacted in poorly drained soil.

Even a small amount of organic matter can have a dramatic effect on the physical, chemical, and biological properties of soil.

1Brady, N. C. and R. R. Weil. 2004. Elements of the Nature and Properties of Soils, 2nd Edition. Atlanta, GA: Prentice Hall.

The Soil Profile

Most naturally occurring, undisturbed soils have three distinct layers of variable thicknesses. The layers are the topsoil, subsoil, and parent material. Each layer can have two or more sublayers called horizons. Collectively, the horizons make up the soil profile. The predominate parent material varies by location.

Soils’ properties vary with the soil depth. The surface soil, or topsoil layer (O and A horizon in Figure 1–2), usually contains less clay, but more organic matter and air, than the lower soil layers. Topsoil is usually more fertile than the other layers and has the greatest concentration of plant roots.

The subsurface layer (B and C horizon in Figure 1–2), known as subsoil, usually has a higher clay content and lower organic matter content than the topsoil.

Soil properties often limit the depth to which plant roots can penetrate. For example, roots will not grow through an impenetrable layer. That layer may be bedrock (Figure 1–3), compacted soil, or a chemical barrier, such as an acidic (very low) pH. A high water table can also restrict root growth due to poor soil aeration. Few big trees grow in shallow soils because big trees are unable to develop a root system strong enough to prevent them from toppling over. Shallow soils also tend to be more drought-prone because they hold less water and thus dry out faster than deeper soils. Water lost to runoff on shallow soils would instead be absorbed by a deeper soil. In addition, deep soils allow the roots to explore a greater volume, which means the roots can retain more water and plant nutrients.

Soils change in three dimensions. The first dimension is from the top to the bottom of the soil profile. The other two dimensions are north to south and east to west. The practical meaning of this three-dimensional variability is that as you move across a state, a county, or even a field, the soils change.

Five factors of soil formation account for this variation:

  1. Parent material
  2. Biological activity
  3. Climate
  4. Topography
  5. Time

Differences in even one of these factors will result in a different soil type. Soils forming from different parent materials differ. Soils forming from the same parent material in varying climates differ. Soils at the top of a hill differ from soils at the bottom. The top of the hill loses material due to natural erosion; the bottom gains the material from above. Considering the number of possible combinations of these five factors, it is not surprising that more than 450 unique soil series are currently mapped in North Carolina. Globally, more than 20,000 different soil series occur.

soil-horizon

bedrock_6nnevkq

Physical Properties of Soil

The physical properties of soil are characteristics that can be seen, felt, or measured. These include color, texture, structure, and water-holding capacity. Such properties usually determine the suitability of soil as a growth medium. Some physical properties, such as texture, are not economically feasible to change on a large scale.

A soil’s fertility, which is a chemical property, is easier to change than the soil’s physical properties.


Color

Organic matter, the soil minerals present, and the drainage conditions all influence soil color. Color alone is not an indicator of soil quality, but color does provide clues about certain conditions. For example, light or pale colors in grainy topsoil are frequently associated with low organic matter content, high sand content, and excessive leaching. Dark soil colors may result from poor drainage or high organic matter content. Shades of red indicate a clay soil is well-aerated, while shades of gray indicate inadequate drainage (Figure 1–4). In well-drained soils of the NC mountains and piedmont, the subsoil colors are often shades of red, brown, and yellow. In poorly drained soils, the subsoil is grayer in color.

Texture

Soil texture, which refers to the proportions of sand, silt, and clay, influences nearly every aspect of soil use and management. Sand is the largest particle (at 2.0 to 0.05 mm), silt is much smaller (0.05 to 0.002 mm), and clay is the smallest (less than 0.002 mm) (Figure 1–5). To compare particle sizes, imagine that a sand particle is the size of a basketball. On that scale, a silt particle would be the size of a marble, and a particle of clay would be a pinpoint. How fine (clayey) or coarse (sandy) a soil is will determine many of the soil’s physical and chemical properties.

Much of a soil particle’s ability to react with water and nutrients is related to the amount of surface area available. When the individual particle size is small, more individual particles will fit in a given space, and thus make more surface area available. Clay, with its tiny particle size and platelike structure, holds water and nutrients effectively, while sand, which has a large chunky structure, does not. In addition to being smaller, clay particles are composed of different minerals than sand and silt, and a clay particle’s structure is more like a stack of paper plates than a grain of sand (Figure 1–6).

Table 11. Particle type, number of particles per gram, and the average surface area per gram.

Particle TypeDiameter (mm)Number of Particles per gramSpecific surface area (cm2/g)
Clay< 0.00290,260,853,0008,000,000
Coarse sand1.00-0.5072023
Fine sand0.25-0.1046,00091
Medium sand0.50-0.255,70045
Silt0.05-0.0025,776,000454
Very coarse sand2.00-1.009011
Very fine sand0.10-0.05722,000227

Rocks and Gravel

Rocks and gravel, which are large, coarse materials, can be found in many soils, but they are not considered when determining soil texture. Although some rocks and gravel in the soil will not affect plant nutrient uptake, they can make the soil difficult to dig. If the garden is mostly rocks or gravel, the soil will have a reduced water- and nutrient-holding capacity, and will be unfit for growing plants. In such a situation, it may be easiest to install raised beds and import soil.

The relative proportions of sand, silt, and clay determine a soil’s textural class (Figure 1–7). For example, a soil that is 12% sand, 55% clay, and 33% silt is in the clay textural class. Soil texture is a permanent feature, not easily changed by human activity. Consider a typical mineral soil that is 6 inches deep on 1 acre. That soil weighs about 2 million pounds. To change the sand content just 1% would require adding 20,000 pounds (or 10 tons) of sand. A 1% change in sand content would have minimal effect. A significant effect might require a 10% change, which would mean adding 100 tons of sand.

Adding organic matter is a more economically feasible alternative for improving soil. Adding organic matter does not change a soil’s texture—the percentage of sand, silt, and clay in the soil—but adding organic matter will alter soil structure by increasing the porespace and improving drainage. Gardeners can be successful with any soil texture, as long as they know the attributes and limitations of that soil.

Typically, laboratory procedures are used to determine the soil texture. It is possible, however, to use the procedure outlined in Figure 1–8 to determine the textural class by the “feel” method. It takes practice and calibration, but it can provide a reasonable estimate of the soil texture.

Sandy or Coarsely Textured Soils (Figure 1–9)

  • Low in organic matter content and native fertility.
  • Rapidly permeable and do not hold soil moisture.
  • Nutrient leaching is a concern, so proper fertilization is a must. Apply smaller amounts of nutrients, and apply them more frequently.
  • Low in cation exchange and buffer capacities.
  • Well-suited for road foundations and building sites.
  • Feel gritty.

Loamy or Medium-Textured Soils (Figure 1–10)

  • Contains more organic matter.
  • Permit slower movement of water and are better able to retain moisture and nutrients.
  • Are generally more fertile.
  • Have higher cation exchange and buffer capacities.
  • Feel crumbly.

Clayey or Finely Textured Soils (Figure 1–11)

  • Higher nutrient-holding capacity.
  • Higher available water-holding capacity.
  • Finely textured soils exhibit properties that are somewhat difficult to manage or overcome.
  • Often too sticky when wet and too hard when dry to cultivate.
  • May have shrink-and-swell characteristics that affect construction uses.
  • Feel slippery.

How Do Soil Types Affect Gardeners?

Compaction. Compaction occurs when pressure is applied to soil particles and the air and water are pushed out of the porespaces. Large, cubic sand particles are not easily compacted. Clay particles, small and platelike, are easily aligned and can compact, especially when wet. Compaction inhibits the movement of water, gases (air), and roots. Compacted soils have less infiltration, greater runoff, a higher risk of erosion, and more restricted root growth than soils without compaction. Water drains slowly, which may increase the likelihood of plant root diseases.

Erosion. Sand particles are heavy, so they are not easily picked up and moved by water or wind. Clay particles are sticky, so they are not easily moved. Silty loam particles are light and not sticky, so erosive forces easily move them. Eroded soils are usually harder to till and have lower productivity than soils without erosion. The main causes of soil erosion in North Carolina are insufficient vegetative or mulch cover, and improper equipment and methods used to prepare and till the soil (Figure 1–12).

Soil erosion can be minimized by following a few preventive measures:

  • Choose plants suited to the soil so they establish well.
  • Mulch the surface each year with organic materials 1 inch to 3 inches deep.
  • Adequately fertilize to promote vigorous, but not excessive, plant growth.
  • Create a water diversion, such as a grass waterway, to capture and slow water movement.
  • Align rows to follow the land’s contour so that water flowing downhill is slowed.
  • Use proper tillage methods, such as not tilling when the soil is overly wet and not overtilling.
  • Plant a winter cover crop.
  • Consider installing rain gardens to capture sediment and runoff.

Surface Area. The most active part of a soil particle is its surface area. A particle’s surface is where nutrient exchange takes place. Sand particles have a small surface area relative to their mass, meaning they do not hold onto nutrients well. Clay particles have a large surface area relative to their mass, so a small amount of clay can add a significant amount of surface area to a soil, increasing the nutrient-holding capacity.

Structure

Soil structure refers to the grouping of individual soil particles into larger pieces called peds or aggregates. The structure of topsoil is usually granular and resembles chocolate cookie crumbs (Figure 1–13). Good granular structure allows rapid movement of air and water within the soil. Poor granular structure decreases movement of air and water. Good soil structure allows for extensive root development; poor structure can limit root growth. Supplying an adequate amount of organic matter and working the soil only when it is not excessively wet promotes good topsoil structure.

Water-Holding Capacity

Water enters the soil from precipitation or irrigation. It exits by draining from the soil, evaporating from the surface, and through transpiration from plant leaves. Water-holding capacity—the retention of water moving through soil—depends on differences in soil porespace. Ideal soils are half porespace with equal amounts of air and water filling the pores. Too much air means plants will wilt. Too much water means reduced plant vigor and susceptibility to root rot, which occurs due to anaerobic conditions.

Soils differ in the number of large (macro), medium (meso), and small (micro) pores. Macropores, which are more common in sandy soils, take up water more quickly and drain faster than meso- and micropores. This rapid draining from macropores is called “gravitational water” because the weaker forces of adhesion and cohesion in macropores cannot overcome gravity’s pull. Within 24 hours after a saturating rain, gravitational water reaches the lower soil horizons, and the soil is at field capacity: the meso- and micropores are still full of water because their adhesive and cohesive forces are stronger than gravity. Water in the mesopores is available to plants. But when the mesopores lose water as the soil dries through plant uptake and transpiration, soil moisture reaches the permanent wilting point. At the permanent wilting point, micropores are still full of water, but this water is so tightly held that it is not plant-available. Note that plants may wilt before the permanent wilting point if the plant transpires water through the leaves faster than it can take water up from the soil through its roots. This is why plants may wilt on hot days and then recover once the sun goes down and why plants can balance uptake with transpiration (Figure 1–14).

How to Remediate Compaction

Compaction is a likely problem if there has been recent construction or other traffic over the area. Deep cultivation, which is mixing the top 6 inches to 2 feet of soil with a tiller, disk, or hand tools, may be needed to loosen the soil. Incorporation of organic matter during deep cultivation can help to rehabilitate soil structure by creating aggregates and both macropores (for drainage) and mesopores (for plant-available water). Digging or cultivating soil when it is wet or excessively dry can destroy structure.

Be wary of quick fixes, such as starting over with a truckload of topsoil. Unfortunately, there are no standards on material sold as “topsoil.” New problems may be brought on site, such as weed seeds and disease organisms. Adding new topsoil to existing soil may also create drainage problems when water moves through the purchased topsoil and reaches the compacted layer. The water can pool and create unfavorable conditions for root growth.

Clay soils, which tend to hold excessive amounts of water and become compacted easily, present some tricky problems. Common mistakes are adding sand or peat moss to improve drainage. Adding sand to clay will reduce soil structure, lowering porespace. Adding peat moss will increase the clay soil’s high moisture-holding capacity. The best advice is to add smaller amounts of organic matter consistently every year, minimize compaction, and let soil biology naturally improve the structure over time.

Organic Matter

Organic matter consists of the remains of plants and animals and gives soil a gray to very-dark-brown color. Organic matter is home to many soil organisms.

Earthworms, insects, bacteria, fungi, and animals use organic matter as food, breaking it down to obtain energy and essential nutrients. Humus is the portion of organic matter that remains after most decomposition has taken place (Figure 1–16).

When organic matter decomposes in the soil, carbon dioxide is released and replaces some of the oxygen in soil pores. Carbon dioxide is dissolved by water in soil to form a weak acid. This solution reacts with soil minerals to release nutrients that can be taken up by plants. The digested and decomposing organic matter also helps develop good air-water relationships. In sandy soil, organic material occupies some of the space between the sand grains. This binds them together and increases water-holding capacity. In a finely textured or clay soil, organic material creates aggregates of soil particles. This allows water to move more rapidly around soil particles.

The amount of organic matter in the soil depends primarily on rainfall, air temperature, the kinds of plants that have been growing in a soil, management practices, soil temperature, and drainage. Soils that are tilled frequently are usually low in organic matter because tilling decreases residue particle size and increases the amount of air in the soil, increasing the rate of organic matter decomposition. Poorly drained soils tend to have a high percentage of organic matter because low oxygen levels limit decomposition organisms. To build organic matter in garden soil, till in compost when the garden is first created, but do not till in subsequent years. Instead, apply thin layers (1 inch to 3 inches), of organic mulch or compost to the soil surface each year (Figure 1–17). This material will break down, and the organic matter levels in the soil will gradually increase.

Improving the Soil

Good aeration and drainage, as well as the ability to hold adequate moisture and nutrients, are key components of an ideal soil environment. Although there is no cookbook recipe for creating this ideal environment, these are some of the most important strategies for improving soil quality:

  • Minimize soil compaction (do not walk on garden beds or work wet soil) (Figure 1–18).
  • Reduce drainage problems.
  • Decrease erosion.
  • Plant a cover crop (Figure 1–19).
  • Incorporate organic matter.
  • Provide a 1- to 3-inch layer of organic mulch on the soil’s surface.

Organic amendments can improve soils that suffer from high compaction, poor drainage, and erosion. Materials such as compost, manures, and pine bark are more effective and economical than vermiculite, peat moss, sand, topsoil, or perlite. Table 1–2 reviews the amounts of organic material to be added to soil per 100 square feet. When working in small areas, a general rule of thumb is to incorporate a 3- to 6-inch layer of organic material into the soil. The organic matter must be decomposed before plants can use the nutrients. The rate of decomposition of organic matter by soil organisms is affected by moisture, temperature, particle size, the carbon-to-nitrogen ratio, and nitrogen availability. The proper balance of carbon and nitrogen is needed for rapid decomposition, as are warm temperatures and adequate moisture. When using straw, leaves, or sawdust (which are high in carbon), add nitrogen fertilizer while the material is decomposing. Soil microbes use nitrogen during decomposition and may deprive plants, resulting in slow or stunted plant growth. Incorporating organic matter some months before planting the garden allows the material time to decompose and have plant-available nutrients in place for good plant growth.

Table 1–2. Organic Materials and Their Application Rates

Organic MaterialAmount to Be Added per 100 Square Feet
Compost10–20 cubic feet
Corncobs50 pounds (2 bushels)
Hay60 pounds (1 bale)
Leaves75 pounds (3–4 bushels)
Sawdust50 pounds (2 bushels)
Straw60 pounds (1 bale)
Wood chips50 pounds (2 bushels)

Incorporating Soil Amendments

Conditioning soil requires increasing organic matter content to 25% by volume. Incorporating a minimum of 2 inches of material into the top 6 inches of soil will create approximately 8 inches of amended soil. These additions raise the planting bed, improving drainage and making plants more visible. Incorporating more than 50% organic matter may negatively affect plant growth. Be careful when using organic material, making certain that it is fully composted and not merely aged. Microbes attracted to partially decomposed materials will compete with plants for nutrients, especially nitrogen and sulfur, resulting in nutrient deficiencies and poor plant growth.

The best organic matter amendments for clay soils are pine bark (less than 1/2 inch in diameter) and composted leaf mold. The following amendments are not recommended because they do not adequately improve the physical properties of clay soil: peat moss, sand, hardwood bark, wood chips, and pine straw.

For sandy soils, organic matter amendments, such as pine bark or compost, will improve water retention.

Figure 1–19. A cover crop of white rye grass was planted in this annual flower bed. It is being turned under to add nutrients to the soil before planting.

Chemical Properties of Soil

There are strong relationships between soil physical properties and soil chemical properties. For example, surface area is directly related to chemical reactivity.

Cation Exchange Capacity (CEC)

The negative ends of two magnets repel each other. The negative end of one magnet attracts the positive end of another magnet. This same principle affects the retention of plant nutrients in soil. Some plant nutrients are cations, which have a positive charge, and some are anions, which have a negative charge. Just like the opposite poles on magnets, cations will be attracted to anions.

Soil particles are similar to a magnet, attracting and retaining oppositely charged ions and holding them against the downward movement of water through the soil profile. The nutrients held by the soil in this manner are called “exchangeable cations” and can be displaced or exchanged only by other cations that take their place. Thus, the negative charge on a soil is called the cation exchange capacity (CEC). Soils with high CEC not only hold more nutrients, they are better able to buffer or avoid rapid changes in the soil solution levels of these nutrients. A soil test will tell you the CEC number of your soil. Soils high in clay, silt, or organic matter will have a CEC number of 10 or greater, and no remediation is needed. Sandy soils will have a CEC number between 1 and 5. Adding organic matter to these soils will help increase the CEC.

Too Much of a Good Thing: Nitrogen Leaching

Soil testing provides valuable information on pH and plant-available nutrients. Test your soil before planting and every two to three years thereafter. Inexpensive soil test kits are unreliable. To accurately determine your soil characteristics and the proper amount of lime and fertilizer to apply, contact the NC Department of Agriculture and Consumer Services (NCDA&CS). The accuracy of these reports, however, depends on the quality of the sample submitted.

Soil Testing Just like magnets, negative charges repel negative charges. Soils with high CEC tend not to hold anions. As a result, water moving through the soil profile will leach negatively charged nutrients, such as chloride, nitrate, and sulfate out of the root zone. This leaching can result in contamination of groundwater, streams, and lakes or have other environmental implications (Figure 1–20). Excess fertilizer becomes a contaminant and can have adverse effects on human health. The U.S. Environmental Protection Agency has set standards for nutrients in groundwater used for drinking water. This is one of many reasons that appropriate levels of fertilization are essential.

Tips for Collecting a Good Soil Sample

  • Collect samples with stainless steel or chrome-plated tools. Using brass, bronze, or galvanized materials could contaminate the sample.
  • The bucket in which material is collected should be made of plastic.
  • Make sure the collection bucket is clean because even small amounts of residual lime or fertilizer can affect the test results.
  • Avoid taking samples from areas that are obviously different from the norm, such as wet spots, compost piles, animal urine spots, and brush piles, or from under eaves or sites where trash has been burned.
  • Remove large pieces of organic material, such as roots, stalks, and leaves, from the sample.
  • For gardens, new lawns, and other cultivated areas, sample to the depth the soil has been, or will be, tilled. For established lawns, collect the sample 2 to 4 inches deep. For trees and shrubs, take a sample to a depth of 6 inches near the plant’s drip line. Even if the soil looks the same, take separate samples for flower beds, vegetable gardens, fruit orchards, shrub borders, and lawn areas.
  • If using a trowel or spade, dig a hole, then take a slice of soil down one side. Repeat this procedure in five to eight spots for each area to be tested. Mix these cores together to obtain one composite sample. If the soil is very wet, it could be more difficult to mix, but do not attempt to heat the soil to dry it (Figure 1–21).
  • Place about a pint of the composite sample for each area sampled in a soil testing box and label with a return address on the side of the box. Make up a code that will be easy to remember, such as “flawn” for front lawn, “byard” for back yard, or “veg” for vegetable garden. Any combination of letters and numbers can be used. Make notes about where the samples came from so that when you receive the results, you can easily Identify how to treat the areas differently based on the results.
  • Do not tape the boxes in any way. The lids are removed before the boxes go in the soil lab ovens, and tape makes this process difficult. Do not put the soil in a plastic bag before placing it in the box as doing so will prevent proper drying in the lab oven.

Fill out the soil test report sheet, giving as much information as possible. The required items are name, address, county, sample codes, and the crops planned. Reports are sent by mail only if there is a special request submitted to the lab. Otherwise, provide an email address on the form to receive notification that the report is complete and online. Farmers also use the form, so some of the information requested may not apply to gardeners (pounds of lime per acre, for example). Forms and boxes are available from the NCDA & CS or any county Cooperative Extension center.

Learn more about collecting soil samples in SoilFacts: Careful Soil Sampling—The Key to Reliable Soil Test Information (NC Cooperative Extension publication number AG-439-30). For detailed information about the soil test results, refer to NCDA&CS Agronomic Division’s Understanding the Soil Test Report.

How to Use a Soil Test Report

Fertilizing trees and shrubs in a landscape should be based on the amount of rainfall, soil type, the plant’s age, the amount of current growth, and desired future growth. Over application of fertilizer to home landscapes wastes money, contributes to pollution in our rivers, streams, lakes and estuaries, and may damage or kill desired plants. In addition, excess fertilizer can increase the likelihood of disease problems, lead to weak growth, attract pests, and increase the amount of pruning to keep mature plants within appropriate boundaries. A soil test report provides accurate guidance for applying fertilizer.

Example Soil Test Reports

Depending on the crop indicated when the soil sample was submitted, the soil test report provides results in one of two ways:

  • Home garden scale: Recommendations for pounds of lime and a rate and grade of fertilizer per 1,000 square feet (for example, an area 50 feet by 20 feet or 10 feet by 100 feet).
  • Farm/Forest scale: Recommendations for tons of lime and a rate and grade of fertilizer per acre.

At the home gardener scale:

  1. Measure the area to be limed or fertilized.
  2. Multiply the length by the width to determine the number of square feet.
  3. Divide by 1,000 to obtain the number of units to be treated.
  4. Multiply the number of units by the pounds of material to treat 1,000 square feet. This calculation will give the amount of fertilizer and lime needed (Figure 1–23).

Example 1:
If the area is 500 feet by 20 feet, and the suggested lime or fertilizer treatment is 30 pounds per 1,000 square feet:

  1. 500 × 20 = 10,000 square feet
  2. Divide 10,000 by 1,000 = 10 units
  3. Multiply 30 pounds times 10 units = 300 pounds of material (fertilizer or lime) per 10,000 square feet

Example 2:
If the area is 10 feet by 15 feet, and the suggested lime or fertilizer rate is 10 pounds per 1,000 square feet:

  1. 10 × 15 = 150 square feet
  2. Divide 150 by 1,000 = 0.15
  3. Multiply 10 pounds times 0.15 units = 1.5 pounds of material per 150 square feet

Or, look at fertilizer/lime calculations as ratios:

If 5 pounds of fertilizer are applied per 1,000 square feet, how many pounds should be applied to 150 square feet (using the garden size in Example 2)?< /p>

5 lb/1,000 sq ft = X lb/150 sq ft

5 lb × 150 sq ft /1,000 sq ft = X lb

750/1,000 = .75 lb

Example soil test reports and their recommended fertilizer applications can be found in Figure 1–24, Figure 1–25, Figure 1–26, and Figure 1–27.

Soil pH

Soil pH is a measure of the soil’s relative acidity or basicity. The pH scale ranges from 0 to 14. A pH of 7 is a neutral state, representing the value found in pure water. Values above 7.0 are basic, while values below 7.0 are acidic. The pH scale is logarithmic, meaning each unit has a 10-fold increase of acidity or basicity. Thus, compared to a pH of 7.0, a pH of 6.0 is ten times more acidic, and a pH of 5.0 is 100 times more acidic.

Nutrient Availability and pH

The optimum pH for a plant varies with organic matter content and plant type. Plant nutrient availability is strongly tied to the pH in the soil solution (Figure 1–28). Decreasing soil pH directly increases the solubility of the plant nutrients manganese (Mn), zinc (Zn), copper (Cu), and iron (Fe). Acidic soils make these nutrients more available. At pH values less than about 5.5, toxic levels of Mn, Zn, or aluminum (Al), a non-nutrient element very common in our southern soils, may be released. The impact of pH on nutrient availability is very important—both for maximum plant availability and to avoid potentially toxic levels at very low or very high pH.

The optimal pH for growth differs among plants. For example, regardless of organic matter content, azaleas and blueberries are well-suited for a soil pH of about 5.0. In contrast, asparagus can tolerate a basic soil with a pH up to 8.0. A soil pH of 6.5 to 7.0 is often considered “ideal” for most plants, but a little research can help you identify the proper pH for the plants you wish to grow. After obtaining a soil test report, you can take measures to adjust soil pH or select plants that will thrive at the current pH. Extreme pH measures of 4.0 (acidic) or 10.0 (basic) will support little plant life and are very difficult to modify.

Adjusting pH

If the soil pH is too basic for the desired plant, incorporating an acidic soil amendment such as pine bark or compost, or applying elemental sulfur, will lower soil pH. Apply sulfur with caution; too much can harm plants.

If the soil pH is too acidic, apply lime to raise the soil pH. There are two general classes of liming materials: calcitic (without magnesium) and dolomitic (with magnesium). Calcitic lime is composed of calcium carbonate (CaCO3) and can be used on soils high in magnesium. Dolomitic lime is a mixture of calcium and magnesium carbonates (CaCO3 and MgCO3), which is the preferred liming material for soils low in magnesium.

Knowing the soil type or even the current pH is not enough to determine the amount of lime needed. The texture of the soil, organic matter content, crop to be grown, target pH, level of soil acidity, CEC, type and amount of clay, and the current pH are all factors to consider in adjusting pH. Soils low in organic matter or high in sand content require less lime to change the pH than clay soils or those with high organic matter.

Lime is heavily regulated in North Carolina. Lime must be labeled with a guarantee of percent calcium and magnesium. The percent of calcium carbonate equivalent also must be included on the label, as well as the pounds of material that equal 1 ton of standard lime (Figure 1–29). Each type of lime must meet a screening requirement for particle size. Lime pellets are formed from lime that has been finely ground. The pelleted product is less dusty and easier to apply, but is slower to react with the soil.

Lime moves slowly in the soil and neutralizes acidity only in the area where it is applied. To be effective, it should be spread and thoroughly incorporated. It takes several months for lime to react in the soil, which is why it is good to soil test and plan for proper soil pH management. For established lawns, gardens, and ornamentals that require lime, apply the recommended amount up to 50 pounds of lime per 1,000 square feet in one application to the soil’s surface. For recommended rates over 50 pounds, wait several months to make a repeat application to avoid a surface buildup of lime. For new plantings where the area will be tilled, apply the entire recommended amount at one time.

Learn more in SoilFacts: Soil Acidity and Liming: Basic Information for Farmers and Gardeners.

soil-sample-dwight-sipler-ccby20

Plant Nutrition and Fertilization

Many people confuse plant nutrition with fertilization. Plant nutrition refers to the needs of the plant and how a plant uses the basic chemical elements. Fertilization is the term used when these elements are supplied to the soil as amendments. Adding fertilizer during unfavorable growing conditions will not enhance plant growth and may actually harm or kill plants.

To complete their life cycle, plants need 17 essential nutrients, each in varying amounts (Table 1–3). Of these nutrients, three are found in air and water: carbon (C), hydrogen (H), and oxygen (O). Combined, C, H, and O account for about 94% of a plant’s weight. The other 6% of a plant’s weight includes the remaining 14 nutrients, all of which must come from the soil. Of these, nitrogen (N), phosphorus (P), and potassium (K), the primary macronutrients, are the most needed. Magnesium (Mg), calcium (Ca), and sulfur (S), the secondary macronutrients, are next in the amount needed. The eight other elements—boron, chlorine, copper, iron, manganese, molybdenum, nickel, and zinc—are called micronutrients because they are needed in much smaller amounts than the macronutrients.

Table 1–3. Relative Amounts (out of 100) of the Essential Nutrients Required by Most Plants

Primary Nutrients

Carbon (C)45
Oxygen (O)45
Hydrogen (H)6
Nitrogen (N)1.5
Potassium (K)1
Phosphorus (P)0.2

Secondary Nutrients

Calcium (Ca)0.5
Magnesium (Mg)0.2
Sulfur (S)0.1

Micronutrients

Iron (Fe)0.01
Chlorine (Cl)0.01
Manganese (Mn)0.005
Boron (B)0.002
Zinc (Zn)0.002
Copper (Cu)0.0006
Molybdenum (Mo)0.00001
Amounts unknown for Nickel (Ni) and Cobalt (Co)


Soil Nutrients

For a plant to absorb an element, it must be in a chemical form used by the plant and dissolved in the soil water. In addition to those nutrients already dissolved in soil water, nutrients can be present in the soil in these forms:

  • Undissolved or granular form, as from newly applied fertilizer
  • Chemicals bound to soil particles
  • The chemical structure of soil organic matter released by microbial decomposition

Undissolved or granular nutrients, and those that are chemically bound to soil particles, are not immediately useful, although they have the potential to benefit the plant. For many plant nutrients, the soil acts as a bank. Withdrawals are made from the soil solution, much as you would withdraw money from a checking account. The undissolved pool of soil nutrients is like a savings account. When checking funds are low, transfers are made from the savings account to the checking account. When a checking account is flush with money, some can be moved to savings for long-term retention. In the same way, for many plant nutrients, when the soil solution has excess nutrients, some bind to the soil to become temporarily unavailable, and some react with other chemical elements to form insoluble minerals, which can dissolve again later.

Several factors improve a plant’s ability to use nutrients:

  • Type of soil: The more clay and organic matter a soil has, the higher its CEC will be, and the more cationic (positively charged) nutrients it will retain.
  • Soil pH: The pH affects how tightly nutrients are bound to soil particles. If the soil pH is extremely high (basic) or very low (acidic), many nutrients become inaccessible to the plant because they are no longer dissolved in the soil water.
  • Types of nutrients in the soil: Some nutrients affect the availability of other nutrients. In fact, an apparent deficiency of one nutrient may actually be caused by a large amount of another.
  • Amount of soil water: Too much rain leaches nutrients from the soil. If there is too little water, the nutrients cannot dissolve and move into the plant.
  • Anything that affects the plant’s growth: If growing conditions are good, a plant will absorb nutrients from the soil. If the plant experiences extremes in temperature, incorrect light levels, or waterlogged or compacted soil, it will have a limited ability to absorb nutrients. Also, plants in dormant stages absorb few nutrients.

The presence or absence of nutrients can cause outward symptoms to appear on the plant. Table 1–4 reviews the essential nutrients for plant growth and symptoms that may appear if a plant is suffering a deficency or an excess of that nutrient.

Fertilizers

Fertilizers provide some elements that might be lacking in the soil and stimulate healthy, vigorous growth. How much and when to apply fertilizers should be based on observing plant performance, a reliable soil test, and an understanding of the factors that affect growth: light, water, temperature, pests, and nutrition. Simply applying fertilizer because a plant is not growing adequately will not solve many plant problems (insects, disease, or poor drainage, for example), and, in fact, excess nitrogen can often increase insect and disease infestation.

All fertilizers are labeled with three numbers, giving the percentage (by weight) of nitrogen (N), phosphorus (P), and potassium (K). This is referred to as the fertilizer grade.

A 100-pound bag of fertilizer labeled 0-20-10 has 0 pounds of N, 20 pounds of P (reported as P2O5), 10 pounds of K (reported as K2O), and 70 pounds of filler. Filler is added to make the fertilizer easier to spread and to reduce the likelihood of burning plants with too much fertilizer (the fertilizer salts can pull water out of the plant). A fertilizer may also contain secondary macronutrients or micronutrients not listed on the label because the manufacturer does not want to guarantee their exact amounts.

Fertilizers can be divided into two broad categories: natural and synthetic.

Natural fertilizers are commonly misnamed “organic.” “Natural fertilizers” is a more accurate description because these materials can be both complex chemical substances containing carbon (organic materials) or inorganic ores, such as rock phosphate, which are mined. Natural fertilizers containing organic materials include manures and composts, animal byproducts (such as bone meal, blood meal, feather meal), and seed meals. Natural fertilizers that are inorganic ores include potassium and lime.

Natural fertilizers typically release nutrients at a slower rate and over a longer period than synthetic fertilizers because microorganisms are involved in a breakdown and release cycle called mineralization. Moisture, temperature, and the microbial species and populations in the soil affect mineralization. Some water-soluble natural fertilizers, such as fish emulsion, are available when rapid nutrient delivery is desired.

When using natural fertilizers, it is helpful to incorporate them and provide adequate moisture for active microbial populations. When packaged as fertilizers, natural fertilizers will have the nutrient analysis stated on the labels. How much to use varies with the nutrient content of the material. The age of the material is also a factor. Producers are not required by law to state the nutrient content on bulk organic materials, such as compost, manure, and sludges. The source of these materials should be investigated and possible analysis performed at the Plant, Waste, Solution, and Media Lab at the NCDA&CS Agronomic Division before applying large amounts to a home garden.

The age of the natural fertilizers is another important factor. When natural material decays and is rained on, it loses nutrients, especially potassium and, to some extent, nitrogen. Even natural sources of nutrients can be overappled and damage plants. Fresh manures, for example, may injure plants by adding excessive nitrogen or potassium, especially when applied in large quantities.

Natural fertilizers can be expensive if applied in amounts adequate to supply nutrients for good plant growth, but have the added benefit of improving soil structure and plant vigor. When applying natural fertilizers, calculate as closely as possible the amounts of nutrients being supplied. Always err on the low side of application rates, then test the soil and augment as recommended on the soil test report. The nutrient content may need to be supplemented with other natural or synthetic materials to achieve a balanced ration of nutrients.

Synthetic fertilizers are made through industrial processes or mined from deposits in the earth. They are purified, mixed, blended, and altered for easy handling and application. Most are noncarbonaceous chemicals from nonliving sources and are usually cheaper than natural fertilizers. In general, nutrients are more rapidly available to plants because they are more water-soluble or in a form plants can use. The disadvantage is that it may be easier to over apply a synthetic fertilizer than a natural one, which may result in fertilizer burn. In addition, synthetic fertilizers may not support beneficial microbial populations to the same extent as natural fertilizers.

Special-purpose fertilizers are packaged for plants such as camellias, rhododendrons, and azaleas (Figure 1–43). Some of the compounds used in these fertilizers have an acid reaction that can be beneficial to acid-loving plants if the soil they are growing in is naturally neutral or alkaline; however, most soils in North Carolina are usually acidic so these special fertilizers are unnecessary.

Fertilizer spikes or pellets are fertilizers compressed into a form placed in the soil or pots (Figure1–44). They are convenient, but are expensive per unit of fertilizer and do not provide uniform distribution. Nutrients are often concentrated around the spikes or pellets.

Liquid fertilizer can be purchased as a dry powder or as a concentrated liquid (Figure 1–45). Liquid fertilizers are frequently used for houseplants or as a starter solution for transplants. They tend to be more expensive per unit of fertilizer because they are made from refined chemicals.

Foliar fertilizers are dry powders or concentrated liquids that are mixed with water and sprayed on plants (Figure 1–46). Foliar feeding is used when insufficient fertilizer was applied before planting, when a quick growth response is wanted, when micronutrients are locked in the soil, or when the soil is too cold for the plant to use fertilizer in the soil. Foliar-applied nutrients are absorbed and used by the plant quite rapidly. They are expensive per unit of nutrient and only give short-term fertilization (completely absorbed within one to two days). Relying totally on foliar fertilization can be time consuming because the fertilizer must be applied regularly. Improper foliar application of fertilizers can also lead to plant tissue burn.

Learn more about fertilizer usage and nutrient concentrations in the North Carolina Agricultural Chemicals Manual, Chapter IV – Fertilizer Use.

Fertilizer Terms

Fertilizer analysis: The minimum amount of each element in a fertilizer as stated on the label, such as 16-4-8.

Fertilizer ratio: The relative proportion of N, P2O5, and K2O. The ratios of 16-4-8 and 8-2-4 are both 4:1:2, which means 4 parts nitrogen to 1 part phosphorus to 2 parts potassium.

Balanced fertilizer: A fertilizer containing equal parts of each major element, such as 10-10-10.

Complete fertilizer: A fertilizer containing nitrogen, phosphorus, and potassium. Examples of commonly used fertilizers are 10-10-10, 16-4-8, and 12-4-8.

Incomplete fertilizer: A fertilizer missing one or two of the macronutrients, such as 0-20-0.

Weed and feed fertilizers: A combination of fertilizer and herbicide. They are often used on lawns to prevent certain weeds from germinating, or to kill existing broadleaf weeds.

High analysis: A fertilizer containing 30% or more active nutrients, such as ammonium nitrate 33-0-0. The cost per bag is usually more, but the cost per pound of nutrient is less, lowering the cost for fertilizing a given area.

Incomplete fertilizers can be used separately or combined to supply the needed nutrients, often at a reduced cost compared to using a complete fertilizer. For example, gardeners who have a soil with sufficient P and K can save money by applying a nitrogen-only fertilizer, such as ammonium nitrate (34-0-0). If a soil test indicates N and K are needed, but not P, use an appropriate amount of ammonium nitrate and muriate of potash (0-0-60), a naturally occurring material composed almost entirely of potassium, processed to remove impurities and concentrate the product. If a soil needs only P, use triple super phosphate (0-46-0), or for an organic nutrient source apply bone meal (approximately 3-15-0; note that this will add some N) or compost.

Regardless of the fertilizers used, be aware that excess fertilizer can damage plants and move into our stormwater systems, which can cause serious environmental problems.

Plant Nutrients and the Environment

Fertilizer misuse causes environmental and water quality issues. Nitrogen fertilizers, for instance, break down into ammonium and nitrate. The nitrate form of N, while essential for plant growth, is highly mobile and can move through the soil after rainfall or irrigation and contaminate drinking water supplies. Phosphorus holds tightly to soil particles and does not leach through the soil, but affects water quality through runoff and soil erosion. Excess nitrogen and phosphorus are associated with algal blooms (heavy growth of aquatic plants) and limited oxygen, and cause fish kills in lakes, bays, and nonflowing water bodies.

There are several ways to reduce fertilizers’ impacts on water quality:

  • Apply only materials that are recommended based on results of a soil test. If possible, use slow-release fertilizers and incorporate into the soil. Avoid applying excess nitrogen and phosphorus fertilizer.
  • Calibrate fertilizer spreaders properly and clean spreaders over the lawn area instead of a hard surface.
  • Keep the amount of hard surfaces in a landscape to a minimum. When installing a new sidewalk or patio, consider using gravel, porous concrete, stepping-stones, wood decking, or bricks on a sand base (Figure 1–47).
  • Avoid applying fertilizer to hard surfaces, such as sidewalks, patios, driveways, and streets. Sweep up material that falls on hard surfaces.
  • Maximize water absorption by aerating lawns and incorporating organic matter in planting beds and gardens.
  • Prevent runoff by turning off irrigation when the soil is no longer absorbing water.
  • Avoid applying fertilizer in natural drainage areas or ditches.
  • Minimize soil erosion by using ground covers, windbreaks, terraces, and mulches.
  • Mulch under trees and shrubs to reduce impact of falling water.
  • Maintain a lawn border around planting areas and plant a grass strip between rows in fruit and vegetable gardens.
  • Plant cover crops on bare soil, such as barren vegetable gardens.
  • Use a rain barrel under drains to collect runoff and direct excess runoff from roofs onto grassy areas (Figure 1–48).

When to Apply Fertilizer

Soil type affects the frequency of fertilizer application. Sandy soils require more frequent applications of smaller amounts of nitrogen and potash than do clay soils because these nutrients leach more readily in sandy soils. Other factors that affect application frequency include the plant to be grown, the amount of plant growth desired, the amount of water, and the type and release rate of fertilizer applied.

The best time to apply fertilizer and the most effective method of applying it depend on the type of plants being grown. Leafy vegetables require more nitrogen than root crops. Corn is a heavy nitrogen feeder and may require several small nitrogen applications when actively growing. Most established woody plants perform well without fertilization, or with just one application per year. Young plants may benefit from several light applications of fertilizer per year.

Fertilizer is needed when plants are actively growing, never when they are dormant. Nitrogen application will have its greatest effect three to four weeks after application. Excess or improperly timed nitrogen can delay flowering and fruiting or promote tender new growth vulnerable to frost or freeze damage.

Research has shown it is best to broadcast or incorporate fertilizer uniformly over an area rather than concentrating fertilizer in holes or bands in the soil. The most effective method of fertilizing a large area is with a fertilizer spreader; for home gardens, hand fertilization works fine. For new plantings, incorporate fertilizer into the soil and mix it thoroughly. For established plantings, surface application is appropriate.

When fertilizing from overhead, make certain plant foliage is dry and use a broom to brush fertilizer off the foliage, or water thoroughly after applying fertilizer to remove it from plant leaves to prevent burn spots. It is not necessary to remove mulch when fertilizing; irrigation or rainfall will carry fertilizer to the roots. Fertilization should be reduced or delayed during dry weather because the salts in the fertilizer can burn roots if there is inadequate moisture.

Calibrating a Spreader

Fertilizers are more effective if they are applied at the proper rate and with uniform coverage. To accomplish this, calibrate the spreader, which requires a little labor and math.

The two types of spreaders used to apply fertilizer and lime are drop spreaders (Figure 1–49) and rotary spreaders (Figure 1–50). The amount of fertilizer that is spread depends on the opening setting, the type of fertilizer, and the speed at which the spreader is pushed. The drop spreader has a series of holes at the base that can be adjusted to apply different amounts of material. With the rotary spreader, the fertilizer falls into a rotating plate and is spread by the centrifugal force of the plate spinning. Instructions for calibrating a spreader should be available on the Internet at the home page for the spreader manufacturer.

The Biology of Soil

There is more life below the soil surface than there is above. Soil life consists of burrowing animals, such as moles and earthworms, insects, and other soil creatures that are difficult or impossible to see without a microscope, such as mites, springtails, nematodes, viruses, algae, bacteria, yeast, actinomycetes, fungi, and protozoa. There are about 50 billion microbes in 1 tablespoon of soil. In a typical soil, each gram (what a standard paperclip weighs) likely contains these organisms, listed from largest to smallest:


  • Nematodes—10 to 5,000
  • Algae—1,000 to 500,000
  • Protozoa—1,000 to 500,000
  • Fungi—5,000 to 1,000,000
  • Actinomycetes—1,000,000 to 20,000,000
  • Bacteria—3,000,000 to 500,000,000

Soil-dwellers move through the soil, creating channels that improve aeration and drainage. Nematodes and protozoa swim in the film of water around soil particles and feed on bacteria. Mites eat fungi, and fungi decompose soil organic matter. The microorganisms’ primary role is to break down organic matter to obtain energy. Microorganisms help release essential nutrients and carbon dioxide and perform key roles in nitrogen fixation, the nitrogen and phosphorus cycles, denitrification, immobilization, and mineralization. Microbes must have a constant supply of organic matter, or their numbers will decline. Conditions that favor soil life also promote plant growth.


Unfavorable soil conditions, such as high temperatures, compaction, or oversaturation can injure beneficial soil life. This can lead to a proliferation of disease-causing fungi, bacteria, or viruses. To read more about common soil diseases see chapter 5,“Diseases and Disorders.” Plants that are stressed by disease are often more susceptible to insect damage. More information on insects can be found in chapter 4, “Insects.” To learn more about managing insects and diseases, please see chapter 8, “IPM .”


To promote soil organisms, incorporate organic matter, till as little as possible, minimize soil compaction, maintain favorable soil pH and fertility, and use organic mulch on the soil surface.

Further Reading


Brady, Nyle C., and Ray R. Weil. The Nature and Properties of Soils. 14th ed. Upper Saddle River, New Jersey: Prentice Hall, Inc, 2007. Print.


Buol, S. W., et al. Soil Genesis and Classification. 6th ed. Hoboken, New Jersey: John Wiley & Sons Inc., 2011. Print.


Dunne, Niall, ed. Healthy Soils for Sustainable Gardens. Brooklyn, New York: Brooklyn Botanic Garden, 2009. Print.


Maynard, Donald N., and George J. Hochmuth. Knott’s Handbook for Vegetable Growers. 5th ed. Hoboken, New Jersey: John Wiley & Sons, Inc., 2007. Print.


Soil Fertility Manual. 5th ed. Peachtree Corners, Georgia: International Plant Nutrition Institute, 2003. Print.


Table 1–4. Essential Nutrients for Plant Growth

MACRONUTRIENTS
NutrientWhy Nutrient is NeededDeficiency SymptomsExcess SymptomsComments
Nitrogen (N)• Responsible for rapid foliage growth and green color
• Easily leaches from soil
• Mobile in plant, moving to new growth
• Reduced growth (Figure 1–30)
• Light-green to yellow foliage (chlorosis)
• Reds and purples may intensify with some plants
• Reduced lateral breaks
• Symptoms appear first on older growth
• Succulent growth; leaves are dark green, thick, and brittle
• Poor fruit set
• Excess ammonia can induce calcium deficiency
• High N under low light can cause leaf curl
• Uptake inhibited by high P levels
Phosphorus (P)• Promotes root formation and growth
• Affects quality of seed, fruit, and flower production
• Increased disease resistance
• Does not leach from soil readily
• Mobile in plant, moving to new growth.
• Reduced growth
• Leaves dark-green; purple or red color in older leaves, especially on the underside of the leaf along the veins (Figure 1–31)
• Leaf shape may be distorted
• Thin stems
• Limited root growth
Shows up as micronutrient deficiency of Zn, Fe, or Co• Rapidly fixed on soil particles
• When applied under acid conditions, fixed with Fe, Mn, and Al
• High P interferes with micronutrient and N absorption
• Used in relatively small amounts when compared to N and K
• Availability is lowest in cold soils
Potassium (K)• Helps plants overcome drought stress
• Improves winter hardiness
• Increases disease resistance
• Improves the rigidity of stalks
• Leaches from soil
• Mobile in plant
• Reduced growth
• Shortened internodes
• Margins of older leaves become chlorotic and burned
• Necrotic (dead) spots on older leaves (Figure 1–32)
• Reduction of lateral breaks and tendency to wilt readily
• Poorly developed root systems
• Weak stalks
Causes N deficiency and may affect the uptake of other nutrients• High N/low K favors vegetative growth
• Low N/high K promotes reproductive growth (flower, fruit)
• Calcium excess impedes uptake of K
Magnesium (Mg)• Leaches from sandy soil
• Mobile in plant
• Reduction in growth
• Yellowish, bronze, or reddish color of older leaves, while veins remain green (Figure 1–33)
• Leaf margins may curl downward or upward with a puckering effect
• Interferes with Ca uptake
• Small necrotic spots in older leaves
• Smaller veins in older leaves may turn brown
• In advanced stage, young leaves may be spotted
• Mg is commonly deficient in foliage plants because it is leached and not replaced
• Epsom salts at a rate of 1 teaspoon per gallon may be used two times a year
• Mg can be absorbed by leaves if sprayed in a weak solution
• Dolomitic limestone can be applied in outdoor situations to rectify a deficiency
Calcium (Ca)• Moderately leachable
• Limited mobility in plant
• Essential for growth of shoot and root tips
• Inhibition of bud growth
• Roots can turn black and rot
• Young leaves are scalloped and abnormally green
• Leaf tips may stick together
• Cupping of maturing leaves
• Blossom end rot of many fruits (Figure 1–34)
• Pits on root vegetables; stem structure is weak
• Premature shedding of fruit and buds
• Interferes with Mg absorption
• High Ca usually causes high pH
Ca is rarely deficient if the correct pH is maintained
Sulfur (S)• Leachable
• Not mobile
• Contributes to odor and taste of some vegetables
• Rarely deficient
• General yellowing of the young leaves, then the entire plant (Figure 1–35)
• Veins lighter in color than adjoining interveinal area
• Roots and stems are small, hard, and woody
Sulfur excess is usually in the form of air pollutionSulfur excess is difficult to control, but rarely a problem

MICRONUTRIENTS

NutrientWhy Nutrient is NeededDeficiency SymptomsExcess SymptomsComments
Iron (Fe)• Accumulates in the oldest leaves and is relatively immobile
• Necessary for the maintenance of chlorophyll
• Interveinal chlorosis primarily on young tissue, which may become white (Figure 1–36)
• Fe deficiency may occur even if Fe is in the soil when: soil is high in Ca; soil is poorly drained; soil is oxygen deficient; nematodes attack roots; or soil is high in Mn, pH, or P
• Fe should be added in the chelate form; the type of chelate needed depends upon the soil pH
• Foliar fertilization will temporarily correct the deficiency
• May be deficient in centipede grass where pH and P are high
Rare except on flooded soils 
Boron (B)• Important in enabling photosynthetic transfer
• Very immobile in plants
• Failure to set seed
• Internal breakdown of fruit or vegetable
• Death of apical buds, giving rise to witches’ broom
• Failure of root tip to elongate normally
• Young leaves become thick, leathery, and chlorotic (Figure 1–37)
• Rust-colored cracks and corking on young stems, petioles, and flower stalks (such as heart rot of beets, stern crack of celery)
• Breakdown occurs at the base of the youngest shoots

• Tips and edges of leaves exhibit necrotic spots coalescing into a marginal scorch (similar to high-soluble salts) (Figure 1–38)
• Oldest leaves are affected first • Can occur in low pH soils • Plants are easily damaged by excess application •Looks like Mg deficiency,green veins on a yellow leaf.

 
Zinc (Zn)Needed for enzyme activity• Young leaves are very small, sometimes missing leaf blades
• Short internodes
• Distorted or puckered leaf margins
• Interveinal chlorosis (Figure 1–39)
• Severe stunting, reddening
• Poor germination
• Older leaves wilt
• Entire leaf is affected by chlorosis; edges and main vein often retain more color
• Can be caused by galvanized metal.
 
Copper (Cu)Needed for enzyme activity• New growth small, misshapen, wilted (Figure 1–40)
• In some species, young leaves may show interveinal chlorosis while tips of older leaves remain green
• Can occur at low pH
• Shows up as Fe deficiency
 
Manganese (Mn)Needed for enzyme activity• Interveinal chlorosis with smallest leaves remaining green, producing a checkered effect (Figure 1–41)
• Grey or tan spots usually develop in chlorotic areas
• Dead spots may drop out of the leaf
• Poor bloom size and color
• Induced by excessively high pH
• Reduction in growth, brown spotting on leaves
• Shows up as Fe deficiency
• Found under strongly acidic conditions
 
Molybdenum (Mo)Needed for enzyme activity• Interveinal chlorosis on older or midstem leaves (Figure 1–42)
• Twisted leaves whiptail
• Marginal scorching and rolling or cupping of leaves
• Nitrogen deficiency symptoms may develop
• Intense yellow or purple color in leaves
• Rarely observed
 
Chlorine (Cl)Needed for enzyme activity• Wilted leaves which become bronze, then chlorotic, then die
• Club roots
• Salt injury
• Leaf burn
• May increase succulence
 
Cobalt (Co)• Needed by plants recently established
• Essential for nitrogen fixation
Little is known about its deficiency symptomsLittle is known about its toxicity symptoms 
Nickel (Ni)• Needed by plants recently established
• Essential for seed development
Little is known about its deficiency symptomsLittle is known about its toxicity symptoms 


Related Images:

Insects – Pests

Insects thrive in more environments than any other group of animals. They live in the air, on and in the soil, and in water. Insects and mites are among the oldest and most numerous animals on earth, with an estimated 100,000 different insect species in North America alone. A typical backyard contains 1,000 or more different insect species. Some estimates say there are 10 quintillion (10,000,000,000,000,000,000) individual insects on earth at any given time. That means there are approximately 300 pounds of insects for every human pound. With that many insects, how is it possible for plants and animals to survive? The vast majority of insects are harmless or even beneficial; less than 1% are considered pests.

For example:


  • Insects aid in the production of fruits, seeds, and vegetables by pollinating blossoms. Seventy-five percent of the world’s crops (for food, beverages, fiber, medicine, and spices) and up to 30% of the American diet are the direct result of insect pollination, including many fruits (such as apples, blueberries, and raspberries) and vegetables (such as melons, peppers, and squash).
  • Insects improve the soil’s physical condition by burrowing throughout the surface layer. The dead bodies and droppings of insects serve as fertilizer.
  • Insects consume dead plant matter, joining fungi and bacteria in recycling waste in our environment.
  • Insects are valuable scavengers, devouring the bodies of dead animals and burying carcasses and dung (animal waste).
  • Some insects parasitize or prey on harmful insects.
  • Some insects are important as feeders on weed plants and seeds, helping to keep populations low.
  • Insects serve as food sources for birds, fish, mammals, reptiles, and other animals.
  • Some insects produce products humans use, such as honey, wax, silk, and dyes.
  • Many insects such as butterflies and beetles can add beauty to a garden.

This chapter covers insects’ biological structure, insect life cycles, insect classification, non-insect arthropods, strategies for identifying insect problems, symptoms and signs of plant damage caused by insects, the cultural and biological management of insects, and beneficial insects relevant to horticultural plants in North Carolina.


Insect Structures

Adult insects have an exoskeleton, three body regions, three pairs of legs, one pair of antennae, and zero to two pairs of wings. Because legs and other appendages vary greatly to suit the insect’s environment, they are often used to classify insects. Immature insects lack wings.


Exoskeleton


Unlike humans, insects do not have bones or a skeleton but rather a tough outer body wall, called an exoskeleton. The exoskeleton provides support for the internal organs and serves as a barrier to retard water loss. Once it hardens, the exoskeleton restricts growth of the insect and must be molted so that the insect can continue to grow.


The exoskeleton is made of a sheet of cells covered by layers of cuticle. The cuticle contains wax that keeps the insect from drying out and determines how permeable the exoskeleton will be to water. Insects’ bodies are separated into segments, and the cuticle of each segment is formed into several hardened plates called sclerites. These plates are joined together by flexible portions that enable the insect to move. The exoskeleton can be covered with hair, scales, spines, or spurs. The adult insect’s body is made of three parts: head, thorax, and abdomen (Figure 4–1), but the division between the thorax and abdomen is not always obvious.


Head


The main features of the adult insect’s head are the eyes, antennae, and mouthparts.


  1. Eyes – There are two types of insect eyes: simple and compound. Simple eyes (called ocelli) have one lens that perceives light intensity but does not produce an image. Compound eyes are usually large and composed of many small lenses; they can detect movement quite well but do not produce a particularly detailed image. The eyes of most insects are sensitive to color, which helps them to both select flowers to pollinate and detect mates. Some insects can also see ultraviolet light. Many insect larvae, such as caterpillars, have only simple eyes (called stemmata), while adults often have both ocelli and compound eyes.
  2. Antennae – Adult insects have one pair of antennae. Antennae, often referred to as horns or “feelers,” are primarily organs of smell but can serve other functions, such as helping insects perceive humidity changes, vibrations, and wind direction and velocity. Segmented antennae vary greatly in form and complexity and are often useful in identifying insects (Figure 4–2).
  3. Mouthparts – While insect mouthparts differ considerably in appearance, the same basic parts are found in all types of insects (Figure 4–3a and Figure 4–3b). Mouthparts can be used to identify insects, the type of insect that caused plant damage, and the type of insecticide that would be effective in managing an insect problem. There are many types of mouthparts, but most insects fall into one of four categories: chewing, piercing-sucking, siphoning, and sponging. There are also intermediate types, including rasping-sucking (thrips) and chewing-lapping (honeybees, wasps, and bumblebees). In some adult insects, the mouthparts are vestigial and the insect does not feed. The mouthparts of immature insects may vary from those of adults. Larval forms of insects that pupate have chewing mouthparts, regardless of the kind possessed by the insect in its adult stage; for example, caterpillars (larval form) generally possess chewing mouthparts while butterflies and moths (adult form) have siphoning mouthparts. However, nymphs (immature forms of insects that morph slightly with each molt, gradually maturing to the adult form) have the same mouthparts as adults.
  4. Chewing mouthparts leave noticeable holes in leaves, wood, or fruit. Beetles (Coleoptera), caterpillars (Lepidoptera), crickets, grasshoppers, and katydids (Orthoptera), termites (Isoptera), and many other insect orders have chewing mouthparts.
  5. Piercing–sucking mouthparts are a straw-like tube that punctures tissue and sucks fluids from the host. Both plant pests and insect predators can have piercing-sucking mouthparts. They are typical of Hemiptera—(true bugs, aphids, scales, mealybugs, etc.) bloodsucking lice, fleas, and mosquitoes. Plant damage caused by piercing-sucking mouthparts includes stunting, yellowing, distorted growth, and honeydew (excrement produced by some sucking insects), which can lead to sooty mold. In addition, insects with piercing-sucking mouthparts can transmit diseases when they feed. Pesticides applied to the surface of the leaf are less likely to kill an insect because insects feed inside the leaf.
  6. Siphoning mouthparts include a long tube adapted to draw nectar from deep-throated flowers. While they also work like straws, they do not penetrate the plant like piercing-sucking mouthparts. Many moths and butterflies have siphoning mouthparts that may be up to several inches long. When not in use, the tubes are coiled under the head.
  7. Sponging mouthparts are found in house flies, flesh flies, and blow flies, which all have mouthparts with a spongy tip (called labellum) to suck up liquids or readily soluble food.

The mouthparts of immature insects may vary from those of adults; for example, caterpillars (larval form) generally possess chewing mouthparts while butterflies and moths (adult form) have siphoning mouthparts. However, nymphs (immature forms of insects that morph slightly with each molt, gradually maturing to the adult form) maintain the same mouthparts.

Thorax


The thorax is made up of three segments (prothorax, mesothorax, and metathorax). Each segment has a pair of legs, and the wings are attached to the last two segments, which also have spiracles or circular openings used for breathing.

  1. Wings—Most adult insects have two pairs of wings. Wings are a membranous outgrowth of the body wall and contain no muscles. Movement, direction and folding of the wings is controlled by special muscles and sclerites of the thorax. Wings are supported by reinforcing structures called veins. Venation (the arrangement of veins in wings) is different for each insect species and serves as a useful means for insect identification (Figure 4–4). Wing surfaces may be bare or covered with fine hairs or scales. The names of many insect orders end in ptera, which comes from the Greek word meaning “wings.” Thus, each of these names denotes some feature of the wings. Hemiptera means “half-winged,” Hymenoptera means “membrane-winged,” Diptera means “two-winged,” and Isoptera means “equal wings.” If the order ends in aptera, it means the adult has “no wings.”
  2. Legs—The most important characteristic of an insect is the presence of three pairs of jointed legs. In addition to walking and jumping, insects use their legs for digging, grasping, feeling, swimming, carrying loads, building nests, and cleaning parts of the body. Legs vary greatly in size and form and can help determine classification (Figure 4–5).

Abdomen


The abdominal section contains digestive and reproductive organs as well as spiracles. The abdomen may have 11 or 12 segments, but in most cases they are difficult to distinguish. Some insects have a pair of appendages at the tip of the abdomen called cerci , which are used as sensory structures to help insects detect and identify their environments. They may be short, as in grasshoppers, termites, and cockroaches; extremely long, as in mayflies; or curved, as in earwigs.


In addition to six legs, caterpillars may have five (occasionally fewer) pairs of false legs (prolegs) that enable them to move. Prolegs are plump, fleshy, and often hooked to allow the caterpillar to hold onto a plant (Figure 4–6). Sawfly larvae (Hymenoptera) have six or more pairs of prolegs that lack hooks. This is an important distinction to note when looking to manage a caterpillar pest as proper identification of the larvae will aid in selecting an appropriate treatment. For example, some pesticides such as Bt (Bacillus thuringiensis) will work only on lepidopteran larvae and will not work on sawflies.

parts of an insect

Figure 4–1. Parts of an insect.

Different insect antennae.

Figure 4–2. Antennae can be used to identify insects.
A. Pulmose
B. Moniliform
C. Clavate
D. Pectinate
E. Filiform
F. Serrate

mouth parts drawn

Figure 4–3a Mouthparts
A. Chewing
B. Sponging
C. Siphoning
D. Piercing Sucking

mouth parts photos

Figure 4–3b Mouthparts
A. Chewing
B. Sponging
C. Siphoning
D. Piercing Sucking

veins on insect wings

Figure 4–4. Wing venation can be used to help identify an insect.

insect leg line drawings

Figure 4–5. Legs can be used to identify insects.

 prolegs

Figure 4–6. The prolegs are fleshy appendages visible on the left side, true legs visible on the thorax (right side) of both larvae. Top: sawfly with 6 pairs of prolegs that lack hooks. Bottom: pink-washed looper

Insect Life Cycle

A better understanding of insect life cycle stages will help guide proper identification. Positive identification can help determine if there is a need for management and if so, the best timing for that management. Knowledge of insect life cycles can help identify:


  1. The life stage(s) of an insect that may cause plant damage
  2. The life stage of the insect that is easiest to manage
  3. Cultural choices such as choosing resistant varieties or adjusting planting times to insure plants are not in a susceptible stage when a pest is most active
  4. How local climate and ecological conditions may affect insect life cycles

For example, seeing caterpillars defoliating a passionflower vine may be alarming until those caterpillars are recognized as the larval form of the Gulf Fritillary butterfly (Figure 4–7) . If the caterpillars are treated with insecticide, the beautiful adult stage of this beneficial pollinator would never be enjoyed. Cutworms overwinter as eggs on landscape debris, so their numbers can be significantly reduced by properly disposing of weeds and other landscape waste in the fall. The larval form would be much more difficult to manage in the spring. Cabbage loopers can devour vegetables in their larval form, but securing row covers when the adult moths are flying around will significantly reduce the number of eggs laid. Insects may look different in various stages of their development, and being able to recognize those stages will guide decisions about when management is necessary and the appropriate timing of that management.


As many insects go through their life cycles, one distinctive feature is the phenomenon called metamorphosis. The term is a combination of two Greek words:meta meaning “change” and morphe meaning “form.” Metamorphosis is a marked or abrupt change in form or structure. Some primitive orders of insects, such as springtails and silverfish, do not go through true metamorphosis but increase in size while maintaining the same characteristics.


“Gradual” (incomplete) and “complete” are descriptions of how many distinct parts there are in the metamorphosis. Insects that undergo gradual, or incomplete, metamorphosis get larger but do not change their appearance dramatically as they mature. The three stages of gradual metamorphosis are egg, nymph, and adult (Figure 4–8). The nymphs (immature insects) have eyes and antennae, resemble the adults and often have similar feeding habits; however, nymphs are smaller and have no wings. They may have wing pads which are developing wings in young nymphs. As nymphs grow into adults, they undergo a series of molts, where old exoskeleton sheds and new exoskeleton forms. This new exoskeleton expands and then hardens. The stage of life between each molt is an instar. The number of instars, and frequency of molts, varies considerably with species and to some extent with food supply, temperature, and moisture. Many insects that go through incomplete metamorphosis undergo dramatic changes. Examples of insects that undergo gradual metamorphosis include earwigs, grasshoppers and their kin, bugs and their kin, cockroaches, and termites.


Most insects undergo complete metamorphosis, passing through four distinct stages: egg, larva, pupa, and adult (Figure 4–9). A larva may or may not have legs, antennae, or compound eyes. Sometimes they appear wormlike or are covered with spines or tufts of hair. Larvae may molt several times but generally do not change their form until they reach the pupal stage. During the pupal stage, the insect becomes inactive and does not eat but undergoes a profound change. Some insects spin a cocoon or web, or roll a leaf around their bodies for protection. During pupation many tissues and structures, such as prolegs, are completely broken down and true legs, antennae, wings, and other structures of the adult are formed. The adult has little or no resemblance to the larval stage and may be associated with an entirely different habitat. The adult insect spends its often short adulthood reproducing. Its food is often entirely different from that of the larval stage. Insects that undergo complete metamorphosis include beetles, butterflies, ants, bees, moths, wasps, flies, and fleas.


gulf fitillary caterpillars

Figure 4–7. Gulf Fritillary caterpillars can destroy passion flower vines but they will turn into beautiful butterflies.

gradual metamorphosis

Figure 4–8. Gradual metamorphosis- egg, nymph, and adult.

complete metamorphosis

Figure 4–9. Most insects undergo complete metamorphosis from an egg, larvae, pupa, to adult.

Insect Classification

Identification of the thousands of species of insects would be impossible if we did not organize a standard classification system. Like the plant kingdom, the animal kingdom has major divisions known as phyla. Several of the phyla that contain horticultural pests include:


  • Arthropoda (insects, spiders, crayfish, millipedes)
  • Nematoda (roundworms, nematodes, trichina)
  • Platyhelminthes (flatworms, flukes, tapeworms)
  • Mollusca (snails, slugs, clams)

More than three-fourths of the animals known to exist belong to the phylum Arthropoda. Arthro means “jointed” and pod means “foot.” Characteristics common to arthropods include paired, jointed appendages; chitinous exoskeleton; segmented bodies; and bilateral symmetry.

The phylum Arthropoda is divided further into different classes. Table 4–1 describes a few of the more important classes and presents some characteristics that are used to distinguish insects from other arthropod classes. For an arthropod to be further classified into the Insecta class, it must have three body segments and three pairs of legs.


Table 4–1. Classes of the Phylum Arthropoda
ClassExamplesMajor Body RegionsPairs of Legs
Malacostracacrayfish, sowbugs25
Arachnidaspiders, mites, ticks1 or 24
Symphylasymphylans212
Insectabugs, beetles, butterflies33

Classes are further divided into orders. The more important orders of the class Insecta are listed in Table 4–2. Insect orders are broken down into groups known as families of very closely related insects. Family names end with idae. Aphididae (aphids), Muscidae (houseflies), and Blattidae (cockroaches) are examples of insect families.


Table 4–2. Some Orders of the Class lnsecta and Their Characteristics
OrderCommon NameMetamorphosisMouth PartsWings
Coleopterabeetles, weevilscompletechewing2 pairs
Collembolaspringtailsnonechewingnone
Dermapteraearwigsgradualchewing2 pairs
Dipterafliescompletechewing, piercing-sucking or sponging1 pair
Hemipteratrue bugs, aphids, scalesgradualpiercing-sucking2 pairs
Hymenopterabees, wasps, antscompletechewing2 pairs
lsopteratermitesgradualchewing2 pairs
Lepidopterabutterflies, mothscompletechewing or siphoning2 pairs
Neuropteralacewings, antlions, dobsonfliescompletechewing2 pairs
Orthopteracrickets, grasshoppersgradualchewing2 pairs
Siphonapterafleascompletechewing or rasping-suckingnone
Thysanopterathripsgradualrasping-sucking2 pairs
Thysanurasilverfishgradualchewingnone

Families are further divided into genera and species. These are the most specific levels of the classification system. The house fly, Musca domestica, serves here as an example of classification:


Phylum ………… Arthropoda

Class ……………..Insecta

Order …………….Diptera

Family ………….Muscidae

Genus …………. Musca

Species ………….domestica


Insects often acquire common names; sometimes one species may have several common names. For example, Helicoverpa zea, when found on corn, is called the corn earworm, but when found on tomatoes, it is called the tomato fruitworm. Common names are often used to refer to large groups of insects, such as families or orders. The term “beetle” refers to the entire order Coleoptera, which includes thousands of different species. The term “moth” refers to thousands of species in the order Lepidoptera.


When to space …

When a common name includes the type of insect, the name is two words, for example “honey bee.” However, if the common name includes the name of another order (not the one in which the insect is classified), the name is one word—for example, “ladybug” (also called “lady beetle”) because the insect is actually a beetle rather than a true bug.

Insect Orders Important to Gardeners

The ability to classify an insect to the correct order gives access to valuable information such as the type of mouthparts the insect has. Knowing the mouthparts tells us about the insect’s habitat, how it feeds, and its life cycle and gives clues about useful management strategies, including proper timing for best control.


COLEOPTERA(from Greek koleos = “sheath” + ptera = “wings”)


Coleoptera—beetles, weevils, and soft bodied larvae, called grubs—is the largest order of insects (Figures 4–10 a-b). These insects vary greatly in size, food, and habitat. They can feed on agricultural, horticultural, and weed plants. Some are insect predators, scavengers, parasites, and decomposers. They may also be pests of stored grain products. Coleopterans occupy almost every habitat in which insects are found. Almost 40% of all insects are beetles. Beetles have a pair of hardened opaque outer wings, called elytra, that meet in a straight line down the thorax and abdomen and that cover the folded second pair of flexible, transparent wings used to fly.


In some species only the adult or the larval stage damages plants; in other cases, both the adult and the larval stages cause harm. In still other cases, neither the larval nor adult causes harm. Larvae may feed on roots, stems, foliage, buds, seeds, fruit, or woody tissue. Coleopteran larvae can be distinguished from other insect larvae by their hardened, often dark head, chewing mouthparts, and the presence of spiracles along their bodies. Some common examples of coleopterans include Japanese beetles, wireworms, June beetles, rootworms, striped cucumber beetles, plum curculios, pea weevils, Mexican bean beetles, Colorado potato beetles, flea beetles, weevils, and cane borers.


Several characteristics are common to most beetles:

  • Adults have a hardened, dense outer skeleton; size and shape vary greatly.
  • Adults have two pairs of wings; the outer pair is hardened or leathery, and the inner pair is membranous and folds under the front wings.
  • Adults and larvae have chewing mouthparts.
  • Adults usually have noticeable antennae, which can be club shaped, serrated, feathery, bead-like or threadlike.
  • Soft-bodied larvae have three pairs of legs on the thorax and no legs on the abdomen. Weevil larvae lack legs on the thorax.
  • All Coleoptera undergo complete metamorphosis.

DERMAPTERA (from Greek derma = “skin” + ptera = “wings”)


Dermaptera (Figure 4–11), known as earwigs, are nocturnal insects that hide during the day in leaf litter, mulch, and under bark. They are generally scavengers or predators. They are believed to be good nocturnal feeders of aphids.


Earwigs share several common traits:

  • Adults are moderately sized, elongated, flat, brown insects.
  • They have two pairs of wings: front wings that are short and leathery and leave the abdomen exposed and a hind pair that is membranous and folds under the front pair.
  • Adults have movable forceps (cerci) on the abdomen.
  • Their antennae are threadlike.
  • Adults and nymphs have chewing mouthparts.
  • They metamorphose gradually. Nymphs resemble adults, only smaller or lacking true wings. Their forceps are also softer.

DIPTERA (from Greek, di = “two” and ptera = “wings”)


This is the order of true flies (Figure 4–12). Most insects have four wings, but dipterans have only two. The size of the adult varies from less than 18-inch to more than 1 inch. They range in color, and most are soft­bodied. Some adults feed on nectar, some are blood feeders, some are parasites of other insects, and many are predators. Although they are less known than bees, flies are important pollinators. Fly larvae occur in a wide variety of habitats, though many live in some sort of aquatic environment. Plant­feeding larvae generally feed within the plant tissue—for example, leaf miners, borers, and gall formers. Many species feed during the larval stage in decaying plant or animal matter.


Common traits for the order include the following:

  • Two adult forewings are membranous and clear.
  • Hind wings are small knobs called halteres, which are used for stabilization during flight.
  • Larvae are legless and wormlike (maggots) or can be aquatic forms.
  • Adults lack chewing mouthparts; they are either piercing or sponging. Larval mouthparts are variable, but many (especially maggots) have simple mouth hooks. They can cause plant damage, but most do not.
  • They undergo complete metamorphosis.

HEMIPTERA (from Greek, hemi = “half” and ptera = “wings”)


This order includes true bugs and sucking insects in the former order Homoptera. True bugs include stink bugs, plant bugs, squash bugs, boxelder bugs, chinch bugs, damsel bugs, and the predaceous assassin bugs (Figures 4–13 a-g). Insects in the former order Homoptera include scale insects, mealybugs, whiteflies,aphids, cicadas, leafhoppers, planthoppers, treehoppers, spittlebugs, wooly aphids, and psyllids (Figure 4–14 a-k). The former order Homoptera is now included in this group. Both hemipteran nymphs and adults feed on plants by puncturing seeds, stems, foliage, flowers, or fruit and then sucking the sap. Some hemipterans may inject a toxin into the plant, which causes further damage. Injury to plants is characterized by mottled grey spots on foliage, deformed buds or fruit (catfacing), wilting, or death. Some hemipterans may also carry plant diseases. Some Hemiptera, however, are helpful predators of other insects.


Common traits among hemipterans include:

  • Adults and nymphs usually resemble one another.

  • Adults and nymphs have piercing-sucking mouthparts that can cause damage to plants.

  • If pests, both adults and nymphs cause damage.

  • They undergo incomplete metamorphosis; the stages are egg, nymph, and adult. They do not go through a pupal stage.

Common traits among true bugs include:

  • Adults usually have two pairs of wings. The first pair are “halfwings” (leathery at the base and nearly transparent at the tip). The second pair is membranous and smaller; at rest, the transparent tips overlap.

  • Many true bugs give off an unpleasant odor when disturbed.

Common traits among the former homopterans include:

  • Many secrete “honeydew”, especially certain scales, aphids and white flies.

HYMENOPTERA (from Greek, hymen = “membrane” and ptera = “wings”)


Hymenoptera (Figures 4–15 a-f) includes bees, ants, beneficial predatory and parasitic wasps, sawflies, and horntails. Their egg­laying organ (ovipositor) is well developed; some are modified into stingers for defense. Males, however, cannot sting. In adult form, hymenopterans can often be found around flowers.


Common traits include:

  • Most adults have two pairs of membranous wings (hind wings are smaller).
  • Most adults have a pinched waist.
  • Adults have rather soft or only slightly hard bodies.
  • Some species organize into societies.
  • Larvae are grublike or maggotlike. They have either no legs (wasps, bees, ants) or three pairs of legs on their thorax and six pairs of prolegs (without hooks) on their abdomen (some sawfly larvae).
  • Most have chewing mouthparts, although some adults have chewing-lapping mouthparts.
  • They undergo complete metamorphosis.

LEPIDOPTERA (from Greek, lepid = “scale” and ptera = “wings”)


Lepidoptera (Figure 4–16 a-c) is composed of butterflies, moths, and skippers. Not all adults feed, but those that do feed on nectar or other liquid food. Adults do not harm plants, but they lay eggs that hatch into plant-eating larvae with chewing mouthparts called caterpillars. Most larvae feed externally on plant materials; others are leaf miners, borers, and gall makers; a few are predators. We classify larvae based on the damage they cause to different plants. Some of the names for lepidopteran larvae include budworms, cutworms, borers (potato tuberworm, peach tree borer, European corn borer), fruitworms (codling moth, oriental fruit moth, pickleworm, tomato pinworm, squash vine borer), webworms (fall webworm, eastern tent caterpillar), leaf miners, leaf rollers, leaf folders, and leaf crumplers. Other insects in the Lepidoptera include loopers, corn earworms, monarch butterflies, cankerworms, redhumped caterpillars, imported cabbageworms, and parsley worms. Many will pupate in silk cocoons; some do not. Injury to plants is characterized by tears, tunnels, and ragged holes in the affected plant part.


Common lepidopteran traits include:

  • Adults are soft-bodied, with four well-developed membranous wings covered with small scales.
  • Larvae are wormlike caterpillars, variable in color, and voracious feeders.
  • Larvae generally have three pairs of segmented legs on the thorax and five or fewer pairs of prolegs on the abdomen.
  • The adult’s mouthpart is a coiled, sucking tube.
  • Larvae have chewing mouthparts that cause damage to plants.
  • Lepidopterans undergo complete metamorphosis and have one or more generations per year.

NEUROPTERA (from Greek, neuro = “veined” and ptera= “wings”)


Neuroptera (Figure 4–17 a-d) includes lacewings, antlions, mantispids, and dustywings. Many are terrestrial, but some are aquatic. Many of these insects are predators, especially the larval forms. Antlion larvae live in the sand and construct pit falls to trap prey. Lacewing larvae prey on aphids, mites, and scale insects. Adults tend to be predatory as well. If the larval forms are not predatory, adults will sometimes feed on nectar, pollen or honeydew. Some species are available commercially for biological control.


Common traits include:

  • Adults have two pairs of membranous wings with an extensive pattern of veins and cross veins.
  • At rest wings are held flat to the body or held up to resemble a tent.
  • Most are weak fliers.
  • Their antennae are long.
  • Larvae have piercing-sucking mouthparts and are predatory. They do not cause damage to plants.
  • They undergo complete metamorphosis.

ORTHOPTERA (from Greek, ortho = “straight” and ptera = “wings”)


Examples of insects in Orthoptera (Figures 4–18 a-b) include grasshoppers and katydids. Food and habitat vary, depending on species. Most orthopterans are plant feeders but they can be predators, scavengers, or omnivores.


Orthopterans share the following traits:

  • Adults are moderate to large and often have rather hard bodies.
  • Adults have two pairs of wings. The front wings are elongated, narrow, and hardened; hind wings are broad, many-veined, membranous, and usually fold under front wings when at rest. Some wings are small.
  • Enlarged hind legs are common and assist in walking, jumping.
  • Both adults and nymphs of pest species cause damage to plants.
  • Nymphs resemble adults, but they have wing pads or are wingless.
  • They have chewing mouthparts and can damage plants, but some are predators.
  • They metamorphose gradually.

THYSANOPTERA (from Greek, thysano = “fringe” and ptera = “wings”)


Thysanoptera (thrips; singular and plural) are thin, tiny insects with four narrow, fringed wings in the adult stage (Figure 4–19). During their life, they change gradually in size and slightly in form. Several generations occur each year if conditions are favorable. They do not fly well but can travel great distances by wind. Some thrips feed on other insects or mites and are beneficial, but many cause damage to commercial crops. Discolored and distorted flowers and buds or gray speckled areas on fruit or foliage characterize injury to plants. Thrips scrape the feeding surface and suck up the plant’s fluids. Thrips can transmit tomato spotted wilt virus.


Common traits of thrips include:

  • Adults are small, around 1 mm in length, soft-bodied insects.
  • They are often present on flowers or leaves.
  • They have two pairs of wings that are slender and featherlike with fringed hairs.
  • They have rasping-sucking mouthparts that can cause damage to plants.
  • Thrips metamorphosis is intermediate (between simple and complete).

Japanese beetle

Figure 4-10a. Japanese beetle, order Coleoptera.

S. Siegers  CC BY – 2.0

Bark weevils

Figure 4–10b. Bark weevils (Cossoninae), order Coleoptera. Though many weevils live on plants, there are also those that live under bark and feed on fungus. The most extreme bark weevils (Scolytine and Platypodinae) can be serious tree pests.

Matt Bertone

Earwigs

Figure 4–11. Female earwig guarding and caring for her eggs, order Dermaptera.

Matt Bertone

diptera

Figure 4–12. A blow fly (Calliphora livida), order Diptera.

Matt Bertone

southern green stink bug

Figure 4–13a. Southern green stink bug (Nezara viridula), a true bug in the order Hemiptera.

Matt Bertone

plant bug

Figure 4–13b. Plant bug, a true bug in the order Hemiptera.

Matt Bertone

squash bug

Figure 4–13c. Squash bug, a true bug in the order Hemiptera.

grassrootsgroundswell  CC BY – 2.0

boxelder bug

Figure 4–13d. Boxelder bug, a true bug in the order Hemiptera.

Anita Gould, Flickr  CC BY-NC-SA – 2.0

chinch bug

Figure 4–13e. Chinch bug (Blissus insularis), a true bug in the order Hemiptera.

Matt Bertone

damsel bug

Figure 4-13f. A damsel bug, predatory beneficial insect, a true bug in the order Hemiptera.

Matt Bertone

assassin bug

Figure 4–13g. Predatory assassin bug, a true bug in the order Hemiptera.

S. Siegers  CC BY – 2.0

scale insect

Figure 4–14a. Scale insect, order Hemiptera (formally Homoptera).

Sam Droege, Flikr  CC BY – 2.0

mealybug

Figure 4–14b. Mealybug, order Hemiptera (formally Homoptera).

Eran Finkle, Flickr  CC BY – 2.0

whiteflies

Figure 4–14c. Whiteflies, order Hemiptera (formerly Homoptera). Greenhouse and citrus whiteflies are the pest species in NC. All whiteflies feed in the phloem and excrete honeydew on which sooty molds often grow. Heavily infested plants may die.

NC State Cooperative Extension

aphids

Figure 4–14d. Aphids both adult and nymphs, order Hemiptera (formerly Homoptera).

Matt Bertone

cicadia

Figure 4–14e. Cicada molting, order Hemiptera (formerly Homoptera).

Matt Bertone

leafhopper

Figure 4-14f. Leafhopper (Sibovia occatoria), order Hemiptera (formerly Homoptera).

Matt Bertone

planthopper

Figure 4-14g. Flatid planthopper, order Hemiptera (formerly Homoptera).

Matt Bertone

treehopper

Figure 4-14h. Thorn treehopper (Umbonia crassicornis), order Hemiptera (formerly Homoptera).

Matt Bertone

wooly apihd

Figure 4–14j. Asian wooly hackberry aphid, order Hemiptera (formerly Homoptera).

Matt Bertone

spittlebug

Figure 4–14i. Spittlebug, order Hemiptera (formerly Homoptera). Adult (left), nymph (right) secretes liquid and whips it into foam and stays inside. This is to protect from predators and also extreme temperature fluctuations.

Rob N Beth, Satish Nikam, Fickr  CC BY-NC-SA – 2.0

psyllid

Figure 4–14k. Hop-hornbeam psyllid, order Hemiptera (formerly Homoptera).

Matt Bertone

honeybee

Figure 4–15a. A worker honey bee (Apis mellifera), order Hymenoptera.

USGS Bee Inventory, Sam Droege  CC BY – 2.0

queen carpenter ant

Figure 4–15b. Queen carpenter ant, order Hymenoptera.

Matt Bertone

braconid wasp

Figure 4–15c. A beneficial braconid wasp, order Hymenoptera. Emerged from lumber infested with powder post beetles (Lyctus planicollis).

Matt Bertone

Parasitoid wasp

Figure 4–15d. A parasitoid wasp (Pteromalidae) checking out freshly peeled bark on Pinus taeda, order Hymenoptera.

Matt Bertone

Sawfly larvae

Figure 4–15e. Sawfly larvae, order Hymenoptera.

Matt Bertone

horntail

Figure 4–15f. Female horntail (Tremex columba), order Hymenoptera.

Matt Bertone

orange sulfer butterfly

Figure 4-16a. Orange sulphur butterfly, order Lepidoptera.

John Gerwin

virgina creeper sphinx moth

Figure 4-16b. Virgina creeper sphinx (Darapsa myron), order Lepidoptera.

Lynette, Flickr  CC BY-NC-SA – 2.0

skippers

Figure 4–16c. Sliver spotted hoary edge skipper, order Lepidoptera.

John Gerwin

brown and green lacewing

Figure 4–17a. Brown (above) and green lacewings, order Neuroptera. Lacewing larvae are predators to aphids.

Matt Bertone

ant lion

Figure 4–17b. Ant lion larvae (top) build small dirt cone traps that prey fall into and cannot get out of. The larva will wait at the bottom with its large mouthparts. The adult ant lion is pictured at the bottom, order Neuroptera.

Matt Bertone

Mansipid

Figure 4–17c. Mantispid, order Neuroptera.

Ken-ichi Ueda  CC BY – 2.0

dustywing

Figure 4–17d. Dustywing, order Neuroptera.

Matt Bertone

grasshopper

Figure 4–18a. Eastern lubber grasshopper (Romalea microptera), order Orthoptera.

Matt Bertone

katydid

Figure 4-18b. Female Katydid (Conocephalus), order Orthoptera.

Matt Bertone

thrips

Figure 4–19. Thrips, order Thysanoptera.

Matt Bertone


Common Non-Insect Arthropod Pests of Plants or People in the Garden


SPIDER MITES


Spider mites are tiny, soft-bodied animals with two body regions, a thick thorax, three (on larvae) or four (on nymphs and adults) pairs of legs, and no antennae (Figure 4–20). Nymphs and adults have sucking mouthparts. They are so small that they are often not discovered until after they have damaged the plant. Foliage, buds, stems, and fruit of infected plants may become red, bronze, rust, yellow, white, or brown from feeding damage. Spider mites spin light, delicate webs over buds and between leaves where they feed. Mite populations are favored by hot, dry conditions and can spread from field or road margins by wind currents.


There are several common species:


  • Two-spotted spider mites, and near relatives, can be clear, green, orange, or reddish. They have two small spots on the back that are difficult to see without a magnifying glass.
  • Southern red mites are dark red.
  • Clover mites are larger, brown or gray, flat, and have very long front legs.

Some mites are beneficial predators that eat other mites. They generally move faster than the damaging mites and are often less hairy.


SPIDERS


Spiders have two body regions clearly distinct from one another, separated by a thin waist. Most spiders are beneficial predators. North Carolina has two dangerous spiders: the black widow and the brown recluse. The black widow spider is shy, likes dark places, and spins a characteristically messy web. The female is normally a shiny, black, moderate-sized spider with a red or orange hourglass marking on the underside of the abdomen (Figure 4–21). Males and immature females can have stripes of red, yellow, and black on the abdomen.


Brown recluse spiders are only found natively in the far western tip of the state; they are extremely rare in most of North Carolina. Wolf spiders and other hunting spiders are often confused with brown recluses. Brown recluses have six eyes arranged in pairs and a dark brown fiddle- or violin-shaped mark on its head. The spider is light brown or gray with long, delicate legs and is about the size of a quarter when mature (Figure 4–22).


TICKS


Ticks are parasitic blood feeders of animals and humans. Larvae have six legs; nymphs and adults have eight legs but no antennae (Figure 4–23). Many can carry diseases. Hard ticks have a hard dorsal plate called a scutum and mouthparts that are visible from above. Soft ticks lack a scutum, are soft-bodied, and have mouthparts visible from below.


MILLIPEDES


Millipedes are slender, somewhat wormlike animals, with two pairs of legs on most of their body segments (Figure 4–24). Very young millipedes have only six legs. But as they grow, they gain more pairs of legs with each molt. This is why millipedes have garnered the nickname “thousand leggers.” Millipedes lay their eggs in damp places. They usually eat decaying plant matter but sometimes feed on the roots of ornamental plants to obtain moisture when the weather gets dry. Ordinarily, more complaints about millipedes occur during wet weather (millipedes like dampness but not long rainy periods), when they may invade people’s homes. When disturbed, some millipedes curl up and secrete a foul-smelling fluid containing cyanide compounds.


CENTIPEDES


Centipedes strongly resemble millipedes, except that they have longer antennae, a flat cross section, and only one pair of legs on each body segment (Figure 4–25). They are beneficial predators of other arthropods, and they do no damage to plants.


PILLBUGS AND SOWBUGS


These pests are similar to millipedes in biology and in the damage they cause to ornamental crops, but they differ in that they have only one pair of legs per body segment, for a total of seven pairs (Figure 4–26). Pillbugs can roll up into small spheres; sowbugs usually cannot roll up. Pillbugs and sowbugs are crustaceans (akin to crayfish) and typically live in damp areas under stones, boards, and dead leaves. Pillbugs and sowbugs sometimes crawl into the drainage holes of houseplant pots to feed on decaying organic matter. These pests work the potting mix out of these holes as they crawl in and out at night. In dry weather, they sometimes feed on tender plants, fruits, or roots to obtain moisture.

spider mites

Figure 4–20. Spider mites.

Matt Bertone

black widow

Figure 4–21. Black widow spider (Latrodectus mactans).

Matt Bertone

brown recluse

Figure 4–22. A female brown recluse spider (Loxosceles reclusa). Note the fiddle-shaped marking on the cephalothorax.

Matt Bertone

lone star tick

Figure 4–23. Female lone star tick (Amblyomma americanum) seeks out vertebrates to suck their blood.

Matt Bertone

millipede

Figure 4–24. Millipede (Polydesmida) has two pairs of legs for every body segment.

Matt Bertone

Stone centipede

Figure 4–25. A stone centipede. Centipedes are beneficial insects that have only one pair of legs per body segment.

Matt Bertone

sow bugs

Figure 4–26. Sow bugs (Oniscidea) have one pair of legs per body segment for a total of seven pairs of legs. They are similar to pill bugs but cannot roll up when touched.

Matt Bertone


Identifying Insect Problems


A detailed picture or an actual specimen is generally necessary for proper insect identification. Photographs can be helpful if they include critical elements. Ensure the subject is in focus as well as large enough to see important features such as legs and mouthparts. Include a scale item such as a finger or a coin in the same focal plane as the subject. Taking several photographs from different angles is helpful.


Avoid answering identification questions over the telephone. Describing what an insect looks like over the telephone can be challenging. Ask as many questions as possible to help identify the problem. For example, ask the following: What was the insect feeding on? How many were there? How were they distributed? Does it appear to be mobile or stationary? Does the insect have wings? Try to get as many facts from the client and consult resources before making any decisions on whether the situation warrants intervention. If a specific pest is suspected, advise the client to look online at pictures. Pesticide recommendations are in the North Carolina Agricultural Chemicals Manual. If a specific pest is suspected, advise the client to look online at pictures. When in doubt, ask an Extension agent to help positively identify the insect. If the Extension agent is unsure, a sample may need to go to the Plant Disease and Insect Clinic at NC State University.


Indices


Pests can be indexed by name and by host plant in pest publications. Cynthia Westcott’s The Gardener’s Bug Book has one of the more complete pest indices by host plant. IPM for Shrubs in Southeastern U.S. Nursery Production: Vol. I also lists insect pests by shrub, shows timing of incidence, and offers management strategies. If the host plant is known, indices can be used to narrow down the list of possible pests. Asking more questions about the size, shape, damage, and secretions of a pest, can further limit the list of potential culprits.


Keys


Entomologists have designed keys to identify insects. A key is a step-by-step process of elimination using morphological characteristics—such as mouthparts, leg parts, or wing veins—that narrow the choices until an identification is determined. Use of these keys depends on knowledge of basic insect structure. Extension publications The Master Gardener Insect Guide for Ornamentals and Turf (AG-433), Insects and Related Pests of Shrubs (AG-189), and Insects and Other Pests Associated with Turf (AG-268) contain introductory keys to pest identification on the family level. By keying a pest to a family and using the indices of pests by host plant, a pest can usually be identified correctly.


Pest Calendars


Many pests occur on plants only at certain times of the year. Pest calendars provide approximate dates when certain insects attack plants and in what stage of life the insects will be. Armed with this information, the field of potential pests can be narrowed. For example, a pest is discovered in a lawn in July. It appears to be an immature insect. According to the Turfgrass Pest Management Manual (AG-348), white grubs are usually not a problem in July, so those can be eliminated as a possibility. Refer to NC State’s Ornamental and Turf Pest Calendars for more information.


Symptoms and Signs of Plant Damage Caused by Insects


Symptoms are descriptions of how the plant reacts to insect damage, whereas signs are the actual evidence that insects leave behind—including frass, feeding traces, castings, dead bodies, and nests. All of this information is used to identify whether the damage was done by insects and if so, what kind of insect.


Feeding Habits: The location of insect feeding damage and the types of damage (tissue bitten and chewed versus tissue pierced and sucked) are valuable information in identifying the responsible insect. Types of damage and examples of insects that could be responsible are listed below.


  • Chewing Damage
    • Entire leaf consumed (with the possible exception of tough midvein): caterpillars like cankerworms, and webworms (Figure 4–27).
    • Distinct sections of leaf missing. Notches cut from leaf margin (black vine weevil adult); circular holes cut from margin of leaf (leaf cutter bees); small randomly scattered holes in leaf (beetles, chafers, weevils, grasshoppers) (Figure 4–28).
    • Leaf skeletonized: slugs, beetles, pear slug (pear sawfly larvae) (Figure 4–29 a), elm leaf beetle (Figure 4–29 b).
    • Leaf rolled into tube or tied together with silken threads: leafrollers and leaftiers (caterpillars from moths).
    • Tunnels between the upper and lower leaf surfaces. Insect or frass visible when leaf is held up to the light: leaf miners (Figure 4–30).
    • Leaf falls in early summer. Slicing petiole lengthwise reveals insect larva: leaf stalk borers, larva of small moth or sawfly, maple petiole borer.
    • Girdled twigs: vine weevil and twig girdling beetle.
    • General decline of the entire plant or a specific branch. Holes in the bark, accumulation of frass, sawdust or pitch: borers, bark beetles, pitch moths.
    • General decline of plant, chewed areas of roots: root feeders—larval stages of weevils, beetles, and moths, including sod webworm, Japanese beetle, root weevil.
  • Sucking Damage
    • Spotting or stippling on leaf resulting from localized destruction of chlorophyll: aphids, leafhoppers, lygus bugs, thrips (Figure 4–31).
    • Random stipple pattern on leaf: leafhoppers, mites (Figure 4–32).
    • General/uniform stippling, flecking, bronzing or chlorotic pattern on leaf: adelgids, lace bugs on azalea, some thrips (Figure 4–33).
    • Leaf curling or puckering: severe aphid infestations, thrips (Figure 4–34)
    • Reduced growth and chlorosis: psyllid yellows on potatoes and tomatoes, scale, mealy bugs
    • Leaf and stem distortion associated with off-color foliage: aphids (distortion often confused with growth regulator injury)
    • General decline of entire plant or section of a plant as indicated by poor color, reduced growth, dieback: scales, mealy bugs, other root, stem, and branch feeders.
    • In addition to direct mechanical damage, some piercing-sucking insects cause additional damage when feeding by injecting toxic substances or diseases. This can cause a range of symptoms.
  • Other Damage
    • Galls, swellings on leaf and stem tissue: aphids, wasps, midges (Figure 4–35).
    • Damaged or split twigs: egg laying (oviposition), treehoppers and cicadas (Figure 4–36).

Distinguishing Between Plant Damage Caused by Insects, Diseases and Environmental Stress


One way to begin the diagnostic process is to determine if the problem stems from biotic (living) factors, including insects and diseases, or abiotic (nonliving) factors including environmental stress. Examine the patterns of damage, location, and progression to determine whether the cause is biotic or abiotic. Look for signs of a living culprit to distinguish between insect and disease causal agents. Use Table 4–3 as a diagnostic tool.


Table 4–3. A diagnostic tool to help determine the cause of plant damage.
Biotic problems include insects, diseases, weeds, nematodes, parasitic plants, animals, and other living organisms.Abiotic problems include water issues, compacted soil, nutrient deficiencies and toxicity, salinity, pH, temperature, sunburn, light, wind, pollution, lightening, root girdling, mechanical injury, chemical injury, and other nonliving plant problems.


BIOTIC (Living)ABIOITIC (Non-Living)
InsectDiseaseWeather, Mechanical, Chemical
LocationGenerally limited to one type of plant (specific host)Generally limited to one type of plant (specific host)Affects multiple types of plants in a specific location
ProgressionOver time progresses on plant and to similar plantsOver time progresses on plant and to similar plantsDoes not progress
SignsFrass, cast skins, insectFungal spores, bacterial oozeNo signs of living pathogen

COMMON MISTAKES IN PEST DIAGNOSIS


If all plant pests were always in the most easily identifiable stage, diagnosis would be simple. However, all 1,700 potential pests of ornamentals in North Carolina have egg stages and immature stages that may be difficult to identify. Following are two examples of common mistakes.


Lady beetle pupa—The pupae of lady beetles attach themselves by the hind end to leaves or twigs. These pupae do not resemble adult lady beetles (Figure 4–37). A home gardener might assume that they are “sucking the life” out of the plant. Quite to the contrary, however, lady beetles help the plant by eating harmful aphids. Each pupa destroyed by a mistaken diagnosis allows thousands of aphids to survive.


Seed-corn maggot flies—Each spring home gardeners discover dead flies on the tips of dogwood and crape myrtle twigs. These flies are infested with an Entomophthora fungus, which “programs” the fly to land on a prominent perch (such as a dead twig) to die. Then the fungus fruits (sporulates) and the spores disperse to infect other flies. The fungus is beneficial because it attacks seed-corn maggots, which consume the inside of seeds, forcing many gardeners to replant. Because the flies often select bare twigs on which to make their last landing, home gardeners sometimes jump to the conclusion that the fly is harming the twig.


Submitting Insect Samples to the Plant Disease and Insect Clinic


If insect identification is not possible, consult the Extension agent in your county. If you still need help, submit a specimen to the Plant Disease and Insect Clinic at N.C. State University.


Follow these instructions:

  • Most insects—roaches, termites, bugs, beetles, flies, wasps, ants, maggots, and spiders preserve in 70 % alcohol.
  • Mites, scales, aphids, and thrips—Send in alive on some part of the affected plant. Place the plant in a plastic bag.
  • Butterflies and moths—Send in dead. Adults can be frozen or put in a kill jar using ethyl acetate fumes. (Nail polish remover contains ethyl acetate.)
  • Caterpillars—Send in alive on some part of the host plant in a plastic bag.
  • Grubs—Send in alive in a pint or two of soil enclosed in a plastic bag.
  • When in doubt, put specimens in 70% alcohol.
  • Collect several specimens if possible.

If a specimen cannot be collected, take digital pictures of the insect and damage to the plant. Tips for good photographs:

  • Be sure to include a “scale” item in images, such as a coin or a thumb.
  • Take many photos from several angles with the flash both on and off.
  • Use the “macro” feature (usually a flower symbol) on a camera to zoom in on the details of the insect. A hand lens can sometimes be put in front of the camera lens to increase magnification.
  • Be sure to take close-up images of the head, thorax, and legs, as well as the underside of the insect.
  • Take images of the insect on the plant if possible as well as on a white or dark sheet of paper.
  • If different life stages of the insect are present, take images of all of them.

Fill out an insect identification form. Provide all of the following information:

  • Date specimen was collected. (Date actually found, not the date submitted.)
  • Town and county where specimen was collected. If not found in a town, give the nearest town. This may or may not be the same as the gardener’s address.
  • Name of collector, the person who captured or collected the insect.
  • What was the insect feeding on when collected? If on a plant, specifically name the plant. If not on a plant, name the location, such as windowsill, carport, or closet.
  • List the severity of the damage or infestation.

webworms

Figure 4–27. Fall webworms completely consume leaves.

U.S. Fish and Wilidlife Service-Midwest Region CC BY – 2.0

leaf cutter bee

Figure 4–28. Leaf cutter bees have chewing mouth parts. They cut semi-circles out of leaves, roll them up, and use them line their tubular nesting sites. Leaf cutter bees are beneficial insects and do not damage enough plant tissue to be of concern.

Jack Skipworth, Flickr  CC BY-NC-ND – 2.0

Pear sawfly

Figure 4–29 a. Pear sawfly (is often mistaken for a slug) skeletonizer.

bramblejungle, Flickr  CC BY-NC-ND – 2.0

elm leaf beetle

Figure 4-29 b. Elm leaf beetle skeletonizing a leaf.

Jacinta Llunch Valero, Flickr  CC BY-NC-SA – 2.0

leaf miners

Figure 4–30. Leaf miners tunnel through the upper and lower leaf surfaces.

Scot Nelson, Flickr  CC BY – 2.0

aphid damage

Figure 4–31. Aphid damage created areas of bleached stippling on this leaf.

Scot Nelson, Flickr  CC BY – 2.0

spidermite damage

Figure 4–32. A random stippling pattern created by the piercing-sucking mouthparts of spidermites.

Scot Nelson, Flickr  CC BY-NC-SA – 2.0

hemlock wooly adelgid

Figure 4-33. Hemlock woolly adelgid (Adelges tsugae),is an exotic insect pest that has wreaked havoc on forest and stream ecosystems across eastern North America. Small, white, cottony sacs at the base of the needles indicate the insects’ presence.

Nicholas A. Tonelli, Flickr CC BY – 2.0

thrip damage tomato

Figure 4–34. Thrips damage on a tomato plant. Thrips use their rasping sucking mouth parts to feed damaging leaves. As the leaves mature and mature the scar tissue causes them to curl.

Katie Mims, Flickr  CC BY-NC-ND – 2.0

mite gall

Figure 4–35. Galls on cherry leaves caused by the mite Eriophyes tiliae.

Jason Hollinger, Flickr  CC BY – 2.0

oviposition wound

Figure 4–36. Oviposition wounds on a twig.

Armed Forces Pest Management Board, Flickr CC BY-NC-ND – 2.0

ladybeetle stages

Figure 4–37. Stages of ladybeetle development: the small black larva develop into larger black/orange larva. These larvae are dining on aphids. In the center is the ladybeetle pupa.

Jill Siegrist, Flickr  CC BY-NC-SA – 2.0


Types of Insect Injury


Chewing Insects


Some insects feed by chewing external parts of a plant. To get an idea of how prevalent this type of insect damage is, try to find leaves of plants that have no sign of injury from chewing insects. Cabbageworms, armyworms, grasshoppers, Colorado potato beetles, and fall webworms are common examples of insects that cause injury by chewing.


Piercing-Sucking Insects


Another way insects feed on growing plants is by piercing the epidermis (skin) and sucking sap from cells. These insects have a slender, sharp, pointed portion of their mouthparts that they thrust into the plant and suck up plant sap. The hole is so small it is not easy to see. The withdrawal of sap causes minute white, brown, or red spots on leaves, fruits, or twigs. This often results in curled leaves, deformed fruits, or general wilting, browning, or death of the entire plant. The spots remain after management, but new foliage should be normal. Aphids, scale insects, squash bugs, leafhoppers, and plant bugs are examples of piercing-sucking insects. The difference between chewing and piercing-sucking damage can be seen in Figure 4–38.


Internal Feeders


Some insects feed within plant tissues during all or part of their destructive stages. They gain entrance to plants in the egg stage either when their mothers deposit eggs into the plant tissue or the nymphs after hatching from the eggs, eat their way into the plant. In either case, the hole of entry is usually minute. A large hole in a fruit, seed, nut, twig, or trunk generally indicates where the insect has come out, not where it entered.


Common group names for internal feeders include borers in wood or pith; worms or weevils in fruits, nuts, or seeds; leaf miners; and gall insects. Nearly all of the internally feeding insects live inside the plant during only part of their lives and usually emerge as adults. Leaf miners (Figure 4–39) are small enough to find comfortable quarters and an abundance of food between the upper and lower epidermis of a leaf. Management strategies are most effective when aimed at emerging adults or during the immature stages before they enter the plant.


Belowground Feeders


Belowground feeders include chewers, sap suckers, root borers, and gall insects. Their attacks are the same as aboveground pests, except that they harm plant parts below the soil surface. The woolly apple aphid, for example, as both nymph and adult, sucks sap from roots of apple trees, causing the development of tumors and subsequent decay of the tree’s roots. With other belowground insects, the larvae are root feeders, but the adults live aboveground. Examples of belowground feeders include wireworms, root maggots, pillbugs, strawberry root weevils, and grape and corn rootworms.


Egg Layers


Insects can damage plants by laying eggs in critical plant tissues. The periodic cicada, for instance, deposits eggs in one-year-old growth of fruit and shade trees, splitting the wood so severely that the entire twig often dies. As soon as the young hatch, they leave the twigs. Though the dead branches can seem alarming, most established trees will withstand the damage. Pruning out damaged branches would be the only management necessary.


Some insects cause plants to produce a structure of deformed tissue called a gall (Figure 4–35). The insect then finds shelter and abundant food inside this plant growth. The growth of the gall occurs when an adult lays an egg inside plant tissue; the gall develops through reactions with the secretions of the developing larva. A gall-forming insect can cause galls on different plants, but the galls will be similar in appearance. If several species of gall-forming insects attack the same plant, the galls that form will differ in appearance. Although the gall is made entirely of plant tissue, the insect controls and directs the form and shape the gall takes as it grows. While galls may be unsightly, they generally do not cause problems for healthy plants.


Nesting Insects


Besides laying eggs in plants, insects sometimes remove parts of plants for the construction of nests. Leaf-cutter bees nip out neat, circular pieces of foliage, which they carry away and fashion together to form thimble-shaped cells. Some insects fold, roll, or tie leaves together for a protective cover. While it may be disturbing to see some leaves cut or missing from a plant, the damage is often minimal and does not require management.


Vectors of Plant Disease


There is evidence that insects spread more than 200 plant diseases. About 150 diseases are caused by viruses, 25 or more by parasitic fungi, 15 or more by bacteria, and a few are caused by protozoa.


Insects may spread plant diseases in the following ways:

  • Indirectly when they feed, lay eggs, or bore into plants, creating an entrance point for a disease present in the environment.
  • Directly on or in their bodies as they move from one plant to another susceptible plant.
  • Directly as they feed on susceptible plants, they infect them with the disease organism.
  • Indirectly as an essential host for some part of the pathogen’s life cycle, and the disease could not complete its life cycle without the insect host.

Table 4–4. Some Plant Diseases Carried by Insects

DiseaseInsect Carrier
Dutch elm disease (fungus)small beetle
Fire blight (bacterial)pollinating insects
Tomato curly top (virus)beet leafhopper
Tomato spotted wilt (virus)Western flower thrips
Watermelon mosaic virusaphids

Honeydew Producers


Honeydew is a sweet, sticky liquid excreted by insects that feed on sap from the phloem tissue of plants. Aphids, mealybugs, soft scales, and planthoppers feed on phloem by sucking with slender, threadlike mouthparts. Sap from phloem is rich in sugar but poor in other nutrients, so these insects consume large amounts of sap to obtain enough minor nutrients. The pests, therefore, excrete copious amounts of honeydew. Unless washed off by rain, honeydew clings to the plant and surfaces below it.


Honeydew itself is not a harmful substance. However, spores or fragments of dark fungi called sooty mold are blown or carried to the honeydew, and new colonies of sooty mold develop. Many times the tiny strands of sooty mold become so abundant that infested plants appear dark and sooty or almost charcoal gray. The mold can block sunlight to the point that photosynthesis is no longer possible. Heavily infested leaves often die. Feeding by a large number of aphids or scales combined with the heavy coating of sooty mold may drastically reduce the vigor and beauty of ornamental plants.


chewing piercing sucking

Figure 4–38. Chewing damage to a kale leaf, likely from the chewing mouthparts of a beetle (left), and stippling on a bean leaf from the piercing-sucking mouthparts of a lace bug (right).

Scot Nelson, Flickr  CC BY – 2.0

leafminer stages

Figure 4–39. Stages of a leafminer. Eggs are deposited on the surface of a leaf, they become larvae that tunnel through the leaves leaving frass (middle). They pupate and emerge as adult flies..

Martin Cooper Ipswich, Flickr  CC BY – 2.0


Encouraging Beneficial Insects


Take advantage of biological management in a garden by encouraging natural predators such as praying mantids, lady beetles, lacewings, and ground beetles. Increase their populations by providing shelter, food, moisture, and overwintering sites. Some beneficial insect suppliers offer a formulation for feeding and attracting the beneficials to keep them in the garden longer.


Learn to recognize the eggs and larvae of the beneficial insects, and avoid harming them. Praying mantid egg cases are often found in weedy lots. Carry the twig with the cluster attached into the garden and set it in a place where it will not be disturbed. Learn to recognize parasites and their egg cases. For example, the tomato hornworm often has a number of white cocoons, a little larger than grains of rice, on its back. These are from a parasitic wasp. The hornworm will die, and more wasps will emerge. Obviously, it is to a gardener’s advantage to leave that caterpillar in the garden.


Another possibility is to increase the type and number of plants in a landscape that will attract beneficial insects. Search for beneficial insects in the NC State Plant Database. Most composite and umbel plants attract beneficial insects by providing nectar and pollen that prolong the insect’s life. Cosmos and marigolds attract a few beneficial insects, and tansy attracts large numbers. Best results come from planting the attractant plants on the edges of the area instead of interplanting them in the garden.


Insecticides often kill beneficial insects. A selective insecticide has less adverse effect than a broad­spectrum insecticide. Stomach poison insecticides are less likely to harm beneficial insects. Apply insecticides at dusk, as this is the time when most beneficial insects are done foraging for nectar or pollen.


Table 4–5. Plants that attract beneficial insects.

PlantInsects
Black locustLady beetles
CarawayLacewings, hover flies, insidious flower bugs, spiders, parasitic wasps
Common knotweedBig-eyed bugs, hover flies, parasitic wasps, soft-winged flower beetles
CowpeaParasitic wasps
Crimson cloverMinute pirate bugs, big-eyed bugs, lady beetles
Flowering buckwheatHover flies, minute pirate bugs, predatory wasps, tachinid flies, lacewings, lady beetles
Hairy vetchLady beetles, minute pirate bugs, predatory wasps
Queen Anne’s laceLacewings, predatory wasps, minute pirate bugs, tachinid flies
SpearmintPredatory wasps
Sweet alyssumTachinid flies, hover flies, chalcids, wasps
Subterranean cloverBig-eyed bugs
Sweet fennelParasitic wasps, predatory wasps
TansyParasitic wasps, lady beetles, insidious flower bugs, lacewings
White sweet cloverTachinid flies, bees, predatory flies
Wild buckwheatHover flies, minute pirate bugs, tachinid flies
YarrowLady beetles, parasitic wasps, bees
a Other plants that attract a variety of beneficial insects include sage, wallflower, salvia, nasturtium, poppy, zinnia, dill, anise, fennel, coriander, parsley, marigold, aster, daisy, coneflower, bee balm, basil, oregano, mint, cosmos, lovage, wild mustard and canola.


Case Study—Think about IPM: A Cantaloupe Problem

You are concerned about your cantaloupe plant. The vines are doing poorly, some of the fruit has scarring, and you are concerned you will lose the whole crop. You review the diagnostic procedures from chapter 7, “Diagnostics“, and think about the five steps for IPM:


  1. Monitor and scout insects to determine insect type and population levels.
  2. Accurately identify pest and host.
  3. Consider economic or aesthetic injury thresholds. A threshold is the point at which action should be taken.
  4. Implement a treatment strategy using physical, cultural, biological, and/or insecticide control.
  5. Evaluate success of treatments.

1. Monitor and determine insect type

You have noticed the plants not doing well for a few weeks. An insect that looks like a beetle has been flying around the crop. The plants have been in the ground for a few months (are mature) and they appear to have insect damage to their leaves. A younger planting of the same crop suffered from severe damage, and the stems appeared chewed through. Cantaloupe has been planted in the same spot for many years. You feel the insect population is high enough and damage is severe enough to warrant further investigation. You take a sample of the leaves getting leaves that are healthy, partially affected and completely affected by damage. You also try to capture the insect if possible or at least get some good photographs. You review the sample collection information found in the “Submitting Insect Samples to the Plant Disease and Insect Clinic” section of this chapter.


2. Accurately identify the pest and host

Using the samples you research this problem. The leaves appear to be missing sections, especially along the margins, which leads you to believe an insect with chewing mouthparts was present. You carefully examine the sample to see if any insects are still present. You see a yellow and black insect and remove it from the plant for further investigation. The insect is quite active, so you put it in a jar and freeze it to slow it down. Looking at it with your hand lens, you determine it is in the order Coleoptera, or a beetle, because you see two pairs of wings; the outer pair is hardened or leathery with yellow and black stripes, and the inner pair is membranous and folds under the front wings. You also see chewing mouthparts and long jointed antennae. You consult some insect identification guides at the Extension office and discover a photo that looks like your insect (Figure 4–40). You read that cucumber beetles can attack all plants in the cucurbit family and that cantaloupe is in that family. Now that you have a positive ID, you do more research on this insect. You type in “cucumber beetle + extension” into your Internet search engine.


3. Consider economic or aesthetic injury thresholds

The injury to these vines and their fruit is severe enough to warrant management. It may be too late for this year’s crop, but you can research how best to avoid this problem in future plantings.


4. Implement a treatment strategy using physical, cultural, biological, and/or insecticide control

You research cultural strategies to discourage cucumber beetles. Cucumber beetle eggs often overwinter in discarded plant material, so removal of plant material after the growing season and plowing or turning the planting bed will help disrupt this part of the beetle’s life cycle. Crop rotation can be an effective means of managing soil fertility and pest problems. Ideally, plant a different crop family in the spot, waiting at least three years before returning to a cucurbit family crop. The use of resistant varieties is perhaps the most important management tactic. The following cucurbit varieties are resistant to cucumber beetles as seedlings and also have resistant foliage later in the season: Blue Hubbard (squash); Ashley, Chipper, Gemini (cucumber). Use of resistant varieties may not give complete control where infestations are heavy. The NC Cooperative Extension publication AG-295, Insect and Related Pests of Vegetables, gives additional cultural management strategies.


Delaying planting times for more favorable germinating conditions and heavy seeding rates will ensure a good stand. For young seedlings, wire or cloth screen protectors shaped like cones will keep beetles off home plantings until plants are established.


If this combination of management strategies is not enough, insecticides may be needed. In that case, a foliar insecticide applied at the cotyledon stage will retard cucumber beetle feeding and encourage plant establishment. Where insects are abundant, additional foliar applications may be needed to prevent beetles from spreading bacterial wilt and squash virus. For recommended insecticides and rates, consult the current North Carolina Agricultural Chemicals Manual.


5. Evaluate success of treatments

You decide to keep a garden journal or notes about management strategies tried and their results. You realize that it may take more time to see the results of some strategies than others.


cucumber beetle

Figure 4-40. A striped cucumber beetle, Coleoptera order.

Matt Bertone


Frequently Asked Questions

  1. There are spots on my leaves. How can I tell if they are caused by an insect or disease? The first step is accurately identifying the plant. Many insects and diseases are host specific. It is also important to consider any abiotic factors that could cause damage to your plant or leave it susceptible to insects or disease. Is it possible the plant is drought stressed or had herbicide overspray contact the leaves? Has anything in the environment changed recently? Was the plant recently fertilized? Where are the damaged leaves—all over the plant or only on new growth? Are there any wounds on the plant? Ask probing questions and find out as much history on the plant as you can. Insect damage to plants comes from either chewing, sucking, or boring. Indications that insects with chewing mouthparts are feeding on your plants include missing chunks of leaves or stems, skeletonization of leaves or leaf mining. Insects with sucking mouthparts remove sap from plant cells, which can cause stippling (spotting), discoloration, or drooping of leaves, or lead to honey dew. Boring insect larvae tunnel into the plant beneath the bark, leaving sawdust toothpicks on tree trunks or sawdust mounds below. Their adult forms can feed on leaves or twigs. You may look for the insects themselves, insect parts, or frass (excrement). Some fungal diseases can leave spots on leaves. The diseases generally produce “target-like” spots, each with a dark center, yellowing ring, and a brown or red margin between the dead tissue and the live green tissue of the plant.
  2. There are small bumps on the leaves of my hackberry, is it going to die? You would need to see a sample or a photograph, but this is most likely insect galls. Galls are abnormal growth of plant cells due to an injection of a chemical by an adult or larval form of an insect. These chemical causes the plant tissue to swell and become misshapen, forming the bumps you see. Insects often live inside the galls for a short period of time, gaining shelter from predators and feeding off the swollen plant tissue. Galls are quite common on plants like hackberry and oaks. The damage, generally cosmetic, will not kill the plant.
  3. There are many black bugs with orange stripes on their backs flying around in my grass. It looks like somebody spit on my grass in spots.These are most likely two-lined spittlebugs. Both adults and nymphs damage turf by sucking out the plant juices from leaves and stems. They also produce a spittle mass, which is nothing more than a nuisance. In late summer adults can also fly to hollies to feed and cause holly leaves to drop prematurely. Following good turf management practices, reducing excessive thatch, and avoiding overwatering will help manage spittlebugs. Plant a more tolerant turfgrass species such as St. Augustinegrass or zoysiagrass, and avoid centipedegrass if possible. On ornamentals and grape vines, a strong spray of water may be sufficient for management.
  4. How do I get rid of fire ants? Red imported fire ants expand naturally and steadily in our area because their reproductive rates are high and our winters are mild. The mounds are unsightly, and their stings are painful. Both baits and contact insecticides are effective management tools. Common active ingredients are hydramethylnon, spinosad, methoprene, and pyriproxyfen. In bait formulations the active ingredients are shared by the ants in a mound, including the queen (which is the only ant in the colony that can lay eggs), usually resulting in more effective management. Contact products containing the active ingredients acephate, carbaryl, or pyrethroids produce management in a few days if broadcast over the landscape, or in a few hours if applied to individual mounds. Both require water (rainfall or irrigation) to become active. An exception is a product with the active ingredient fipronil, which produces long lasting effects when broadcast in late May to early June. Fipronil will provide five to six months of management. Repeat treatment in November if ant mounds reappear in the fall, as sometimes happens. Be sure to read and follow product labels closely before application in order to achieve desired results. To determine if you have fire ants, look for two nodes between the thorax and abdomen. Other ants only have one. For more information regarding fire ant management in the home landscape type “fire ants + extension” into your internet search engine.

If you have questions about this chapter contact your local NC State Extension Expert at your county’s NC State Extension Center.


Further Reading

Bellows, Thomas S. and T W. Fisher, eds. Handbook of Biological Control: Principles and Applications of Biological Control. San Diego, California: Academic Press, 1999. Print.

Brandenburg, Rick L. and Callie P. Freeman, eds. Handbook of Turfgrass Insects, Second Edition. Annapolis, Maryland: Entomological Society of America, 2012. Print.

Bruneau, Arthur H. and Gail G. Wilkerson, eds. Turfgrass Pest Management Manual: A Guide to Major Turfgrass Pests & Turfgrasses. Raleigh, North Carolina: North Carolina Cooperative Extension Service, 2006. PDF file.

Capinera, John L. Handbook of Vegetable Pests. San Diego, California: Academic Press, 2001. Kindle file.

Clark, Christopher A., et al., eds. Compendium of Sweetpotato Diseases, Pests, and Disorders. 2nd ed. St. Paul, Minnesota: The American Phytopathological Society, 2013. Print.

Common Tree Fruit Pests. Columbia, Missouri: University Of Missouri Extension, 1993. Print. North Central Regional Publication NCR 63

Cottam, Clarence, and Herbert S. Zim. A Golden Guide from St. Martin’s Press: Insects. New York: St. Martin’s Press, 2002. Print.

Cranshaw, Whitney. Garden Insects of North America. Princeton, New Jersey: Princeton University Press, 2004. Print.

Davidson, Ralph H., and William F. Lyon. Insect Pests of Farm, Garden, and Orchard. 8th ed. Hoboken, New Jersey: John Wiley & Sons Inc., 1987. Print.

Dreistadt, Steve H. Pests of Landscape Trees and Shrubs: An Integrated Pest Management Guide. 2nd ed. Davis, California: University of California Division of Agriculture And Natural Resources, 2004. Print. Publication 3359.

Ellis, Barbara W. and Fern Marshall Bradley, eds. The Organic Gardener’s Handbook of Natural Insect and Disease Control: A Complete Problem-Solving Guide to Keeping Your Garden and Yard Healthy without Chemicals. Emmaus, Pennsylvania: Rodale Press, Inc., 1996. Print.

Ellis, M. A., et al., eds. Compendium of Raspberry and Blackberry Diseases and Insects. St. Paul, Minnesota: The American Phytopathological Society, 1991. Print.

Elzinga, Richard J. Fundamentals of Entomology. 6th ed. Upper Saddle River, New Jersey: Prentice Hall, Inc., 2004. Print.

Horst, R. Kenneth, and Raymond Cloyd. Compendium of Rose Diseases and Pests. 2nd ed. St. Paul, Minnesota: The American Phytopathological Society, 2007. Print.

Johnson, Warren T., and Howard H. Lyon. Insects That Feed on Trees and Shrubs. 2nd ed. Ithaca, New York: Cornell University Press, 1991. Print.

Jones, Jeffrey B., et al., eds. Compendium of Tomato Diseases and Pests. 2nd ed. St. Paul, Minnesota: The American Phytopathological Society, 2014. Print.

Leahy, Christopher. Peterson First Guide to Insects of North America. New York: Houghton Mifflin Company, 1998. Print.

Mitchell, Robert T., and Herbert S. Zim. Butterflies and Moths: Revised and Updated. New York: St. Martin’s Press, 2002. Print.

Pirone, Pascal P. Diseases and Pests of Ornamental Plants. 5th ed. New York: John Wiley & Sons, Inc., 1978. Print. Note: This is a good resource for diagnostics; refer to the North Carolina Agricultural Chemicals Manual for the latest chemical information.

Schultz, Warren, ed. Natural Insect Control: The Ecological Gardener’s Guide to Foiling Pests. 1995. Brooklyn, New York: Brooklyn Botanic Garden, 1999. Print.

Schwartz, Howard F. and S. Krishna Mohan, eds. Compendium of Onion and Garlic Diseases and Pests, Second Edition. St. Paul, Minnesota: The American Phytopathological Society, 2008. Print.

Solomon, J. D. Guide to Insect Borers in North American Broadleaf Trees and Shrubs. Washington, DC: United States Department of Agriculture Forest Service, 1995. PDF file. Agriculture Handbook AH-706.

Sutton, Turner B., et al., eds. Compendium of Apple and Pear Diseases and Pests. 2nd ed. St. Paul, Minnesota: The American Phytopathological Society, 2013. Print.

Weinzierl, Rick, and Tess Henn. Alternatives in Insect Management: Biological and Biorational Approaches. Urbana, Illinois: University of Illinois At Urbana-Champaign, 1991. PDF file. North Central Regional Extension Publication 401.

Weinzierl, Rick, and Tess Henn. Alternatives in Insect Management: Microbial Insecticides. Urbana, Illinois: University of Illinois At Urbana-Champaign, 1989. PDF file. Circular 1295.

Weinzierl, R., et al. Insect Attractants and Traps. Gainesville, Florida: University of Florida Institute of Food And Agricultural Science, 2005. PDF file. Publication ENY-277.

Yepsen, Roger B, ed. The Encyclopedia of Natural Insect and Disease Control: The Most Comprehensive Guide to Protecting Plants, Vegetables, Fruit, Flowers, Trees and Lawn. Emmaus, Pennsylvania: Rodale Press, Inc., 1984. Print.

Related Images:

USDA Plant Hardiness Zone Map

USDA Plant Hardiness Zone Map

The 2012 USDA Plant Hardiness Zone Map is the standard by which gardeners and growers can determine which plants are most likely to thrive at a location. The map is based on the average annual minimum winter temperature, divided into 10-degree F zones.  

For the first time, the map is available as an interactive GIS-based map, for which a broadband Internet connection is recommended, and as static images for those with slower Internet access. Users may also simply type in a ZIP Code and find the hardiness zone for that area.  

No posters of the USDA Plant Hardiness Zone Map have been printed. But state, regional, and national images of the map can be downloaded and printed in a variety of sizes and resolutions.  

http://planthardiness.ars.usda.gov/PHZMWeb/

all_states_halfzones_poster_300dpi

Related Images: